December 6, 2013

Creating an HTTP Referrer Condition

By: Craig Taylor
December 6, 2013

Creating an HTTP Referrer Condition

Having the ability to tailor the site experience to your users is one of the major selling points of Sitecore.  One way to customize this user experience is to change content based on the HTTP referrer.

You can see Sitecore's out-of-the-box conditions in the content tree under "\sitecore\System\Settings\Rules\Conditional Renderings\Conditions".  While Sitecore has a folder called "Referrers" here that contains conditions that involve the referrer, there is not one included that compares the name of the referrer. I was surprised to see that Sitecore didn't already have a built-in condition for this, but it doesn't matter too much as Sitecore is easily extensible.  Let's create a new condition to check against.

Creating the Condition

Creating our new condition involves two steps:

  1. Writing code that can check the referrer.
  2. Wiring up the condition to our code that we created in step #1.
We need to write the code for the condition.  Either create a new solution or open up an existing solution that you would like to add your condition to.  I have opened a 'common' solution that contains common code that can be used across multiple sites.

using Sitecore.Rules;
using Sitecore.Rules.Conditions;
using System.Web;

namespace Client.Common.Conditions
{
    public class HttpReferrerContains : WhenCondition where T : RuleContext
    {
        public string HttpReferrer { get; set; }

        protected override bool Execute(T ruleContext)
        {
            if (!string.IsNullOrEmpty(HttpReferrer))
            {
                if (HttpContext.Current.Request.UrlReferrer != null && HttpContext.Current.Request.UrlReferrer.ToString().ToLower().Contains (HttpReferrer.ToLower()))
                {
                    return true;
                }
            }
            return false;
        }
    }
}

So what's going on here?  We are creating a new class that implements "WhenCondition" and "RuleContext."  We specify a public string (HttpReferrer) that will be passed into this class from Sitecore.  We override the base "Execute" method so that we can perform our own check to see if the referrer matches the value that we are looking for as passed in from Sitecore.  If the current UrlReferrer matches the value that we passed in from Sitecore, we return a "true" and we return "false" otherwise.

Now we move on to wiring up the condition inside of Sitecore.  Let's go down to the "\sitecore\System\Settings\Rules\Conditional Renderings\Conditions" folder mentioned earlier.  Right-click on the "Referrers" subfolder and insert a new condition.

Sitecore Conditions

The two fields we are interested in here are "Text" and "Type."  The "Text" field is where you specify how the condition will appear to the content author.

Sitecore Condition Text Field
The first portion of this field is the text that is displayed to the content author.  Inside the square brackets, the field consists of 4 parameters:

  1. 1st parameter: Name of the parameter being passed into your custom code.
  2. 2nd parameter: Name of a macro item.  Here, you can choose an item from "\sitecore\System\Settings\Rules\Common\Macros" and have that macro pop up when the content author clicks the 'clickable' word.
  3. 3rd parameter: Path passed to the macro parameter. (2nd parameter)
  4. 4th parameter: The 'clickable' word.
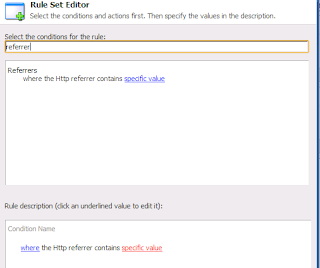
Our example generates the following box:

Sitecore Rule Set Editor


When the content author clicks on "specific value", they are prompted to enter a value to compare.  Also note that "where" is clickable as well and can be switched to "except where."

In the "Type" field, we add a reference to the assembly we created/added to in step #1.

Sitecore Condition Type Input

And that's it!  Now, when you go to personalize a component on the page, you can do so based on the HTTP referrer.

Additional Reading

See how Pieter created a condition and used a slightly different approach where you store the referrers as Sitecore items in the content tree as opposed to allowing free-text entry into the condition by the content author: http://newguid.net/sitecore/2011/sitecore-rules-engine-how-to-create-a-custom-condition/ 

October 22, 2013

Publishing Your XML Sitemaps to Your Content Delivery Servers

By: Craig Taylor
October 22, 2013

Publishing Your XML Sitemaps to Your Content Delivery Servers
My most-recent post talked about how you can utilize the Sitecore Sitemap XML module in order to automatically build robots.txt and XML sitemap files in a mulit-site, hardened environment so that the search engines can see your sitemap(s).  This works great, but a new issue arises if you have separate Content Managment (CM) and Content Delivery (CD) servers.

The Problem

When your content is published, the Sitemap XML module waits for the "publish:end" event to start building the robots.txt and XML sitemap(s).  It does so and stores the files in the file system.  The issue with this is that the processing and creation of files all happens on the CM server, which is behind a firewall.  The CD servers are the web-facing servers that will be serving the sitemap and robots.txt files.  We need the files on the CD servers.

The Solution

I went through a number of iterations in my head about how I could get the robots.txt and XML sitemap files to the CD servers.  I thought about scheduled jobs in Sitecore.  I thought about using an external application that is used for file replication.  I thought about a custom application inside of Sitecore so that a content author could manually kick off a deploy.

After running some of these ideas by a fellow Arke employee and Sitecore MVP, Andy Uzick, I came to realize that I was over thinking my solution by far.  This sort of problem had been solved long ago and is *WAY* simpler than I had originally thought.

The solution is to change the "SitemapXML.config" to subscribe to the "publish:end:remote" event instead of the "publish:end" event.  This event fires after a successful publish and let's remote servers perform the actions specified.  In our case, this lets the SitemapXML module know to build the robots.txt and sitemap(s) files.  Just ensure that you have the SitemapXML.DLL and SitemapXML.config files present on all your CD servers and you're good-to-go!

Very simple solution and now I don't have to manually copy files between servers!

October 17, 2013

Using the Sitemap XML Module in a Hardened, Multi-site Environment

By: Craig Taylor
October 17, 2013

using the sitemap xml module in a multi-site environment

We are using the Sitecore Sitemap XML module (2.0) for one of our clients.  Well, we're using it for a number of our clients, but let's just talk about the one client for now.

The module is pretty neat in that it generates a robots.txt and sitemap.xml files for your sites automatically on publish.  It also has the ability to automatically submit the generated sitemap(s) to a number of specified search engines.

The Problem

The module allows for multi-site instances through the configuration file.  You simply specify the Sitecore sites that should be included and the module will generate the necessary robots and sitemap file entries.  So if the module is already allowing for multi-site instances, what's the problem then?  The problem is that if you have followed the security hardening guide for your Sitecore environment, (you did, didn't you??)  you have prevented Sitecore from serving XML files.  The search engine crawlers are expecting the sitemap in an XML format and since Sitecore has been hardened, it refuses to serve the sitemap files.

The Solution

What we need to do is allow Sitecore to serve the sitemap XML files, but not serve up any other XML files that we want to keep secure. (license.xml file comes to mind. . . )

The first step is to tell sitecore to ignore requests to the sitemap files.  I have a naming convention in place in which all sitemaps on the client's instance are configured as "sitemap_<site_name>.xml."  With this standard in place, I updated "IgnoreUrlPrefixes" setting in the web.config as follows:

<setting name="IgnoreUrlPrefixes" value="/sitecore/default.aspx|/trace.axd|/webresource.axd|...|/sitemap_*.xml" />

This let's Sitecore know that it should not try to resolve to an item in the content tree if a request comes in for an XML sitemap.

The second step is to allow Sitecore to serve the XML file.  My client is using IIS 7, so I updated the handlers in the "system.webServer" node in the web.config.  I added a handler that only lets the sitemap XML files be served:

<add verb="GET" path="sitemap_*.xml" type="System.Web.StaticFileHandler" name="allow xml sitemap" />

I now have a multi-site solution that will automatically generate and manage the robots.txt and XML sitemaps that can be properly indexed by the search engines while still remaining secure.

September 20, 2013

Editing DMS Reports to be Multi-Site Friendly

By: Craig Taylor
September 20, 2013

Making DMS Reports Mult-Site Friendly
My client is using a single instance of Sitecore with multiple sites.  While reveiwing Sitecore's built-in reports for DMS, I noticed something that was going to make it difficult to produce reports that could be broken down by site.

Specifically, when looking at the "Latest Visits" report and when drilling down to the "Visit Detail (Session)" report, I noticed that I can't differentiate between the separate sites.  I would only see the visits as "/home" or "/contact-us."  It is impossible to know which site on the instance the visitor visited.

The Solution

In order to see which site was visited, we need to edit the default report provided by Sitecore.  In this example, we'll look at the "Visit Detail (Session)" report.  This can be accomplished in two steps:

  1. Edit the SQL Query for the report
  2. Edit the Report

Edit the SQL Query for the report

The SQL query for the "Visit Detail" report is located at \sitecore\System\Settings\Analytics\Reports SQL Queries\Visit Pages.  We need to update this query to include the site that was visited.  Luckily, DMS logs this information and stores it in the "Visits" table, in the "MultiSite" column.  We can add this "MultiSite" column to our query and once updated, the (SQL) query should look like this:
SELECT [Duration], [Url], [PageId], [PageId] as [PageIdObject], [Visits].[MultiSite] as [Site]
FROM [Pages] INNER JOIN [Visits] ON [Pages].[VisitorId] = [Visits].[VisitorId] AND [Pages].[VisitId] = [Visits].[VisitId]
WHERE 
  [Visits].[VisitId] = @VisitId
ORDER BY [DateTime], [VisitPageIndex]
I've given my "MultiSite" column an alias of "Site" for clarity.

Note: Even if you're not using Oracle, you might as well update the Oracle script as well in case a database switch is made later down the road:
SELECT "DURATION", "URL", "PAGEID", "PAGEID" as "PAGEIDOBJECT", "VISITS"."MULTISITE" as "SITE"
FROM "PAGES" INNER JOIN "VISITS" ON "PAGES"."VISITORID" = "VISITS"."VISITORID" AND "PAGES"."VISITID" = "VISITS"."VISITID"
WHERE 
  "VISITS"."VISITID" = :VisitId
ORDER BY "DATETIME", "VISITPAGEINDEX"

Edit the Report

Now that the report query has been updated to include which site was visited, we need to update the report to display this information.  While viewing the report, you can click the "Design" button in order to open the Stimulsoft Reports Designer application to edit the report.  I'm sure this might work well, but I wasn't able to get it to work correctly.  I instead went straight to the ".mrt" file in order to edit the report.  The mrt file for the "Visit Detail" report is located at \Website\sitecore\shell\Applications\Analytics\VisitDetail.mrt.  Open it up in your favorite text editor and you will see that it's just XML.

I searched in this file for where the other columns of the report query were being used.  I found the list of columns that were added and I added an additional column for my 'site' column:
<value>Site,System.String</value>
I also incremented the 'count' value for the columns.  The complete section looks like this:
<VisitPages Ref="5" type="Stimulsoft.Report.Dictionary.StiSqlSource" isKey="true">
        <Alias>VisitPages</Alias>
        <Columns isList="true" count="8">
          <value>Url,System.String</value>
          <value>Duration,System.Int32</value>
          <value>Hour,Hour,System.Int32,VisitPages.Duration_x002F_3600</value>
          <value>Minutes,Minutes,System.Int32,VisitPages.Duration_x002F_60</value>
          <value>PageId,System.Guid</value>
          <value>PageIdObject,System.Object</value>
          <value>DurationTimespan,DurationTimespan,System.TimeSpan,new_x0020_TimeSpan_x0028_0_x002C__x0020_0_x002C__x0020_0_x002C__x0020_0_x002C_VisitPages.Duration_x0029_</value>
          <value>Site,System.String</value>
        </Columns>
        <CommandTimeout>0</CommandTimeout>
        <Dictionary isRef="1" />
        <Name>VisitPages</Name>
        <NameInSource>DataConnection</NameInSource>
        <Parameters isList="true" count="1">
          <value>_x0040_VisitId,,14,0</value>
        </Parameters>
        <SqlCommand />
      </VisitPages>

This allows the report to make use of the field, but we now need to add the field to the report.  I then searched for where the text was being built for displaying the page visited.  I found this and added the site name in:
<Text>{string.IsNullOrEmpty(VisitPages.Url)|| VisitPages.Url == "/" ? VisitPages.Site + "/default.aspx" : VisitPages.Site + VisitPages.Url}</Text>

The complete section looks like this:
            <Text21 Ref="58" type="Text" isKey="true">
              <Brush>Transparent</Brush>
              <ClientRectangle>4.83,0,13.97,0.4</ClientRectangle>
              <ComponentStyle>GeneralText</ComponentStyle>
              <Conditions isList="true" count="0" />
              <Font>Arial,10</Font>
              <Margins>0,0,0,0</Margins>
              <Name>Text21</Name>
              <Page isRef="11" />
              <Parent isRef="55" />
              <Text>{string.IsNullOrEmpty(VisitPages.Url)|| VisitPages.Url == "/" ? VisitPages.Site + "/default.aspx" : VisitPages.Site + VisitPages.Url}</Text>
              <TextBrush>Black</TextBrush>
              <TextOptions>HotkeyPrefix=None, LineLimit=False, RightToLeft=False, Trimming=None, WordWrap=True, Angle=0, FirstTabOffset=40, DistanceBetweenTabs=20,</TextOptions>
              <Type>Expression</Type>
            </Text21>

The Results

Now, when drilling down from the "Latest Visits" report to the "Visit Detail" report, we can see that the (redacted) site name is now present on our report:
DMS Visit Detail Multisite Report

August 1, 2013

Creating a GeoIP Lookup Provider for Sitecore using MaxMind’s GeoLiteCity Database

By: Craig Taylor
August 1, 2013

GeoIP lookup provider in Sitecore
Sitecore ships with a built-in GeoIP lookup provider that is configured to use MaxMind’s lookup service. This service is provided for free with a “number of free lookups for testing and implementation convenience” (Engagement Analytics 6.6 Configuration Reference) This service works great, but what happens when your ‘number of free’ lookups expires?

GeoIP Options

When your free intro period expires, you essentially have two options if you want to continue to perform GeoIP lookups.
  1. Migrate to the MaxMind-Sitecore integrated service. (http://www.maxmind.com/en/sitecore) 
  2. Write your own, custom lookup provider.
While the MaxMind-Sitecore integrated service is amazingly simple to implement and run, I wanted to see what else could be used.  

The provider is essentially a ‘black box’ to Sitecore.  It doesn’t matter if it uses a web service, a local database or even a local file to return data lookups.  I decided to try to integrate with a local version of the GeoLiteCity database that is available for free download and use from MaxMind. (http://dev.maxmind.com/geoip/legacy/geolite/)

Creating a new Lookup Provider

Creating a new provider is as simple as creating a class that overrides the “GetInformationByIp” method.  
All we need to do is map the path to the database:

string geoLitePath = Settings.GetSetting(ModuleName + ".DatabaseLocation.GeoLiteCity", "~/app_data/GeoLiteCity.dat");

Pass the IP address to the look up service:

var lookUpService = new LookupService(HostingEnvironment.MapPath(geoLitePath), LookupService.GEOIP_STANDARD);

var location = lookUpService.getLocation(ip);

and populate the “WhoIsInformation” object so that Sitecore can use it:

WhoIsInformation information = new WhoIsInformation();
...
if (location != null)
{
    information.Country = location.countryCode ?? string.Empty;
    information.Region = location.regionName ?? string.Empty;
    ...
}

return information;


Update the Config

After you have created your new provider, update the “Sitecore/lookupManager/Providers” node in the web.config to include a reference to it.  It’s best to do this through a patch include file.


        geoLite
        
          />


And that’s it!  Sitecore makes it easy to change your GeoIP provider to anything else you may want to use. 
You can find complete source code and everything necessary to run this solution in the Sitecore Marketplace.


July 25, 2013

404 Error in ECM When Creating One Time Message

By: Craig Taylor
July 25, 2013

The Problem

ECM 404 Error
Recently, while working on a Sitecore site with ECM 2.1, I ran into an issue in a single environment where I was receiving a 404 error when trying to create a new "One Time Message."

All other environments (DEV, STAGE) were working with no issues.  The page being requested, (/emailcampaign/create/ad hoc messages) was there, just like in the other environments.

The Solution

After troubleshooting for a while, the problem was found in a patch include file for the SitemapXML module.  This module was only being used in Production and that is why the other environments were working.  The module updates the "encodeNameReplacements" node to replace spaces with dashes in an attempt to help with SEO.  This was intercepting the URL request from ECM, modifying it and this prevented Sitecore from finding the requested URL.  To correct this, I simply commented-out the offending configuration:

    <!--<encodeNameReplacements>
      <replace mode="on" find=" " replaceWith="-" />
    </encodeNameReplacements>-->

Watch out, those include files, they will get you.  Use the "admin/showconfig.aspx" page to really be sure what is being included without you realizing it.

May 20, 2013

System.InvalidOperationException after deleting Sitecore administrator account

By: Craig Taylor
May 20, 2013


I was recently configuring multiple environments for a client and one of the things that I *always* do is remove the "admin" user and replace it with another account that has administrator privileges.  You should *always* change the default password for the admin account, but you might as well take it an additional step and change the administrator account name as well.  You don't want to be the one to have to answer to a client or your senior management as to why the default username and password were left in production.  Even better, follow the security hardening guide when your site goes live.


The process I was taking was:
  1. Log into Sitecore using the "admin" account
  2. Create a new administrator account
  3. Log out
  4. Log back in using the 'new' admin account
  5. Delete the old "admin" account
I was bouncing between eight difference Sitecore instances and was essentially moving in 'auto-pilot' mode where I had already thought through what I was trying to accomplish and was quickly progressing through the tasks in the multiple environments.

During the course of removing the user on one of the instances, I ran into the following server error:

5924 10:19:59 ERROR Application error.

Exception: System.Web.HttpUnhandledException

Message: Exception of type 'System.Web.HttpUnhandledException' was thrown.

Source: System.Web

   at System.Web.UI.Page.HandleError(Exception e)

   at System.Web.UI.Page.ProcessRequestMain(Boolean includeStagesBeforeAsyncPoint, Boolean includeStagesAfterAsyncPoint)

   at System.Web.UI.Page.ProcessRequest(Boolean includeStagesBeforeAsyncPoint, Boolean includeStagesAfterAsyncPoint)

   at System.Web.UI.Page.ProcessRequest()

   at System.Web.UI.Page.ProcessRequest(HttpContext context)

   at System.Web.HttpApplication.CallHandlerExecutionStep.System.Web.HttpApplication.IExecutionStep.Execute()

   at System.Web.HttpApplication.ExecuteStep(IExecutionStep step, Boolean& completedSynchronously)


Nested Exception


Exception: System.InvalidOperationException

Message: membership user

Source: Sitecore.Kernel

   at Sitecore.Web.Authentication.TicketManager.Relogin(String ticketId, Boolean redirect)

   at Sitecore.DefaultPage.Page_Load(Object sender, EventArgs e)

   at System.Web.UI.Control.LoadRecursive()

   at System.Web.UI.Page.ProcessRequestMain(Boolean includeStagesBeforeAsyncPoint, Boolean includeStagesAfterAsyncPoint)

It took a bit of looking around to figure out what I did: I deleted the "admin" account when I was still logged-in using that account.  Oops.  Since I never logged-out, Sitecore was trying to use my authentication cookie and put me straight back into the Sitecore UI, but since I deleted the user, it threw the above error message instead and would not let me log in.

To convince Sitecore to allow me log in as another user, I cleared my cache and all was good in my Sitecore world again.

April 16, 2013

Sitecore: MVC Error when Running E-mail Campaign Manager 2.0

By: Craig Taylor
April 16, 2013

I was installing E-mail Campaign Manager 2.0 module (ECM) on a fresh install of Sitecore 6.6 (Update 4) the other day and ran into an issue.  The install process itself is easy: Install the SPEAK 1.0 package and then install the ECM 2.0 package.  Everything appeared to install smoothly.  When I logged into Sitecore and went to the ECM dashboard, I saw that it was actually throwing an error.


Note: The new SPEAK interface looks amazing and is *way* nicer than the ECM 1.3.3 version; Nice work, Sitecore!

If installing the ECM module on a remote computer that has the custom errors turned "On" or "RemoteOnly" in the web.config, you will just see that there is a runtime error:

ECM Runtime Error


If you update the web.config on the remote system to turn the custom errors “Off”, or you remote into the machine and browse to your Sitecore site and open up ECM, you will see the details of the error message:

ECM MVC 2.0.0 Error


So it appears as though the E-mail Campaign Manager module has an undocumented requirement to have ASP.NET MVC 2 installed on the server.

Go to http://www.microsoft.com/en-us/download/details.aspx?id=22079 and download the “AspNetMVC2_VS2008.exe” executable.  Run the exe on your Sitecore server and the ECM won’t complain any longer.

Alternatively, if you already have MVC 3 installed on your server, you can do a binding redirect to point any references to the 2.0 version to 3.0: https://gist.github.com/dunston/5213369

Happy email campaigning!

March 24, 2013

Configuration Settings for Developing a Multi-Site Sitecore Instance with Multiple Developers

By: Craig Taylor
March 24, 2013


Confusing configuration
Confused about which direction to go in with regards to your configuration files in Sitecore? It can be overwhelming to consider all the different options for configuring a solution for a new project. There are many different ways and you have to wade through the options to come up with the best approach.

Over my years of architecting and developing Sitecore websites, I've learned that you should always plan for the possibility of a single-site Sitecore instance to turn into multiple-site Sitecore instance. You should likewise consider the possibility that there will be multiple developers developing these multiple sites. It would be advisable to put in the time now to make sure you aren't accidentally overwriting code later when a looming deadline is approaching and everyone is under the gun.

Basic Solution Architecture

Let’s get a baseline for the types of Visual Studio projects that I have in a basic site Visual Studio solution. Each site is unique in its requirements and there are likely to be exceptions, but for a ‘normal’ site, I will have five basic projects in my solution as follows:
  1. A Web project
    • This project contains the presentation layer components that are used to build the Sitecore website. This includes Sitecore layouts, sublayouts and renderings. The project also contains my site’s CSS, Javascript and any static images not controlled by Sitecore.

      I’ll elaborate on the Web project configuration and the specifics of how to keep multiple sites from stepping on each other’s toes in a future post.
  2. A Team Development for Sitecore (TDS) project
    • This project contains the references that tie back to the Sitecore items for the website. This includes layouts, sublayouts, renderings, templates and sometimes content. TDS enables Sitecore items to be versioned in source control and can also automatically build and deploy Sitecore packages.

      Note: A TDS project can only be tied to a single database. If your project is tied to objects in the Master database and you additionally have changed made to the Core database that you would like to keep in source control, you will have to create a separate project for the Core objects.

  3. A Library Project
    • This project will store any common functionality that can be utilized in multiple locations across your solution. Common classes here include Utility and Settings classes. I also store the object glasses generated from the Custom Item Generator Module in this project.

  4. A Configuration Files project
    • This project contains configuration files that apply only to specific developers’ machines. These files are used for local builds and will not be included in packages that are used for integration testing in a shared development environment. The files included here might be “ConnectionStrings.config”, “DataFolder.config” a customized “Web.config” or “SiteDefinition.config.” Each developer will have his/her own directory structure in this project.

  5. An Instance Configuration Files project (optional)
    • This optional project contains the instance-wide configuration files for Sitecore and can be shared across ‘n’ number of site solutions. The only environment that will include its own folder structure here within this project is the shared development integration environment.

      I list this project as optional because there are times where you won’t want to have too many developers’ hands in the configuration files that affect an entire instance. I keep this project separate from my site project solutions in source control.

      Note: The files included in this project affect an entire instance. If changes are made to these files and committed to source control, they will be changed on the instance and they can potentially affect every site on the instance.

Solution explorer configuration

With this basic definition of projects for a Sitecore solution, let’s dive deeper into how we can manage the configuration files for multiple sites and multiple developers.

Configuration Files

Configuration files come in three flavors and can be located in three separate locations within your solution architecture:
  1. Instance-wide configuration files
  2. Instance wide configuration
    • Stored in the ‘Instance Configuration Files’ project. These files are common to all sites and can be changed by any developer with access. Changes affect all sites on the instance.

  3. Project-specific configuration files
  4. Project wide configuration
    • Stored in the ‘Web’ project. These files are common to all developers of the site and can be changed by any developer for the site. Changes affect only the single site.

  5. Developer-specific configuration files
  6. Developer specific configuration

    • Stored in the ‘Configuration Files’ project. As long as the developer is changing the configuration files within his/her own directory structure, the changes made to these files only affects a single developer.

Solution Configuration

To maintain the configuration files and local builds, each developer should additionally have a solution configuration specified for that developer. This enables ‘Developer 1’ to maintain specific build settings in the solution file that builds and publishes the projects in a particular manner and those build settings can be completely different from ‘Developer n.’

Solution configuration

Wrap it up

At first glance, it looks like there a lot of places to make configuration changes with this architecture and it can be difficult to know where to go to make the changes. In practice, it quickly becomes second-nature to know where to make your changes as 95% of those changes are going to be in the developer-specific configuration files contained within the ‘Configuration Files’ project.

One way configuration
Okay, so maybe there isn’t just one way to configure your Sitecore solution, but I believe this is a good approach that can scale nicely as additional sites and developers are thrown into the mix.

Regardless of the perceived complexity involved in this architecture, the benefits of being able to manage multiple sites and multiple developers without changing configuration settings each time the latest version is pulled down from source control is immeasurable.