Showing posts with label ECM. Show all posts

October 23, 2014

Injecting a Tracking Pixel into Sitecore's Email Campaign Manager

By: Craig Taylor
October 23, 2014

You can't escape the tracker. Source: https://flic.kr/p/7Eru61
Recently, I had a client request that I provide the ability to insert a tracking pixel into their Email Campaign Manger (ECM) emails.  The purpose of the tracking pixel is to allow a third party to collect information from the recipients and collate that data with data from other clients in order to get a better view of recipients across clients and brands anonymously.

Requirements

The requirements were pretty minimal and are as follows:

  • The tracking pixel includes several parameters that are built into the SRC of the image tag that is created.  One of the parameters is a hashed string of the recipient's email address for anonymous tracking purposes.  The implementation must provide the ability for the content author to change these parameters at design time via the Page Editor.
I additionally added a requirement of my own:
  • Avoid having to create a separate layout that would only be used when wanting to include the tracking pixel in an email.  The content authors should be allowed to create emails as they would ordinarily and if a requirement arises for the email to include a tracking pixel, they should be able to add one with ease.

Implementation Options

While researching options for this project, I came up with two possible approaches:

  1. Create a rendering that would handle the insertion of the tracking pixel into the body of the email.
  2. Hook into the subscriber:assigned event of ECM in order to inject content into the body of the message.

Implementation 

I decided to create a rendering that could be included in an email at design time.  This allows the content authors the ability to decide when and if a tracking pixel will be included in an outgoing email.  Had I tried to hook into the subscriber:assigned event, I would be running logic for each outgoing message that would determine whether to insert a tracking tag or not.  This logic would run even for those messages that did not contain a tracking pixel and would only slow down the dispatch process.

My solution consists of a number of Sitecore items and files that interact to get the tracking pixel populated and inserted into the email.  Basically, the implementation can be broken down into these steps:

  1. Update the placeholder settings for a placeholder in our ECM layout so that we can insert the tracking pixel into.
  2. Write a rendering that outputs the tracking pixel to the email.
  3. Create a patch include file to store configuration for the rendering and that creates a new pipeline processor.
  4. Write a pipeline processor to populate the tracking pixel with custom data based on the current recipient.

Update the Placeholder Settings to Allow the "TrackingPixel" Rendering

I had previously written a Responsive Email Template for my client that is now being used for every outgoing email.  I updated the existing "msg-body" placeholder setting to allow for the "Tracking Pixel" rendering.

Placeholder Settings

Write a Rendering that Outputs the Tracking Pixel to the Email

The rendering is where the HTML for the tracking pixel is created.  The pipeline processor later fills in individual values per email, but the static portion of the pixel is inserted here.
public class TrackingPixel : ClientBaseControl
    {
        #region Rendering Parameters

        public string CampaignId { get; set; }
        public string SiteId { get; set; }
        public string PlacementId { get; set; }
        public string ADGroupId { get; set; }
        public string CreativeId { get; set; }

        #endregion

        protected override void CreateChildControls()
        {
            // Ensure the tracking token and src are defined
            Assert.IsNotNullOrEmpty(Sitecore.Configuration.Settings.GetSetting("TrackingPixelSource"), "Tracking pixel source not defined in config file");
            Assert.IsNotNullOrEmpty(Sitecore.Configuration.Settings.GetSetting("TrackingPixelToken"), "Tracking pixel token not defined in config file");

            // Add a visual representation of the control to allow the content author to edit the tracking pixel parameters
            if (Sitecore.Context.PageMode.IsPageEditor || Sitecore.Context.PageMode.IsPageEditorEditing)
            {
                HtmlGenericControl div = new HtmlGenericControl("div");
                div.Attributes.Add("style", "background-color:red; width:150px;display: inline-block;color:white");
                div.InnerText = "TRACKING PIXEL";
                this.Controls.Add(div);
            }

            // Create the tracking pixel image
            HtmlImage image = new HtmlImage();
            image.Attributes.Add("height", "1");
            image.Attributes.Add("width", "1");
            image.Attributes.Add("border", "0");

            // Get the values of the token and SRC of the tracking pixel from the config file
            string src = Sitecore.Configuration.Settings.GetSetting("TrackingPixelSource");
            string anToken = Sitecore.Configuration.Settings.GetSetting("TrackingPixelToken"); 
            image.Attributes.Add("src", String.Format(src, CampaignId, SiteId, PlacementId, ADGroupId, CreativeId, anToken));

            // Add the tracking pixel to the page
            this.Controls.Add(image);
        }
    }

To (briefly) walk you through the code above, we create some public variables to hold rendering parmeters that are to be passed in, we create the rendering output, we ensure that the configuration file is present, we check for page editor mode, we create the HtmlImage element that is the pixel tracker, we format the pixel tracker and we add the pixel tracker to the page.

Note: Because the tracking pixel is essentially a hidden element, we want to ensure that we can edit this in the page editor.  I check for the page editor mode and upon finding it, display a slightly obnoxious red div element that can be selected by a content author for editing purposes.  This especially comes in handy when you need to select the rendering to change the rendering parameters.  When the email is sent, this div is not displayed.

The Page Editor-only mode of the tracking pixel.

Create a Patch Include File to Store Configuration for the Rendering and that Creates a New Pipeline Processor

To maximize code reuse and to allow for a potential future implementations of different vendors of tracking pixels, I store the SRC of the tracking pixel in a patch include file.  I additionally store the placeholder token string that will be replaced by the hashed string value of the recipient email address.

<setting name="VendorName_TrackingPixelSource" value="http://vendorname.com/pixel/3964/?%26col={0},{1},{2},{3},{4}%26id={5}" />

<setting name="VendorName_TrackingPixelToken" value="**HASHED_EMAIL**" />

The configuration file also creates a pipleline processor that is used to populate the tracking pixel rendering.  This processor runs as the first step of ECM's SendEmail pipeline as follows:
    <pipelines>
      <SendEmail>
        <processor type="Client.Division.Common.PipelineProcessors.PopulateTrackingPixel, Client.Division.Common" x:before="*[1]" />
      </SendEmail>
    </pipelines>

Write a Pipeline Processor to Populate the Tracking Pixel with Custom Data Based on the Current Recipient

The pipeline processor is injected into the "SendEmail" ECM pipeline.  It accepts the "SendMessageArgs" arguments and as part of those arguments, it contains the "MailMessageItem" object.  This object is where we can get access to the 'body' and 'to' fields of the outgoing email.

class PopulateTrackingPixel
    {
        public void Process(SendMessageArgs args)
        {
            Assert.ArgumentNotNull(args, "args");
            MailMessageItem message = args.EcmMessage as MailMessageItem;
            
            if (message != null)
            {
                if (!String.IsNullOrEmpty(message.Body))
                {
                    // Ensure the tracking token and src are defined
                    Assert.IsNotNullOrEmpty(Sitecore.Configuration.Settings.GetSetting("TrackingPixelToken"), "Tracking pixel token not defined in config file");

                    // Find the placeholder and replace with the tracking pixel
                    string anToken = Sitecore.Configuration.Settings.GetSetting("TrackingPixelToken"); 

                    args.EcmMessage.Body = message.Body.Replace(anToken, EmailUtil.HashEmailAddress(message.To));
                }
            }
        }
    }

We want the 'body' so that we can take the content, which now contains our tracking pixel rendering, and replace the "**HASHED_EMAIL**" string with an actual hashed email string based on the actual recipient.  We take the "to" and pass that into a custom "HashEmailAddress" method, which returns the hashed email address.

Other Relevant Artifacts

Rendering Parameters

The tracking pixel requires some additional parameters to be passed back to the third party tracking company that further identifies things like "campaignID", "siteID", "placementID", etc.  These are set when the content author places the rendering on the page so that they can be unique to each email campaign.

Email Utility Class

The email utility class contains methods common to email-related tasks.  In this case, I created a couple of methods to allow the hashing of email addresses.

How it's Used

Adding a tracking pixel to an ECM email is now easy with the tracking pixel artifacts in place.  A content author creates an email, uses the "add a new component" icon in the ECM ribbon, adds the tracking pixel rendering to the proper placeholder, supplies parameters via the rendering parameters popup and boom, tracking pixels on all outgoing emails.

Whether it's a tracking pixel or some other form of customized code that you need injected into your emails, I hope this helps!

April 3, 2014

Creating a Responsive Email Template for Sitecore's ECM 2.x

By: Craig Taylor
April 3, 2014

Creating a Responsive Email Template for Sitecore's ECM
My client has been using Sitecore's Email Campaign Manager (ECM) for a while now and all of their emails have used the 'standard' default templates, with most of them using the "Simple HTML Message" template. (Note: I'm using "template" in a generic sense here, and am not talking about a Sitecore data template)  As their new sites designs began to incorporate Responsive Web Design (RWD) methodologies, the question of if ECM could handle responsively-designed emails came up.

The Problem

I didn't see why the 'standard' templates wouldn't work with RWD, so I attempted to paste the entire responsive HTML into the template.  What I quickly found was that pasting HTML into the "body" field of the simple HTML template rendered everything within a "<body>" tag.  This means that I can't add my own code to the "<head>" section as that is already defined in the layout that is utilized by the "Simple HTML Message" template.  Furthermore, I couldn't put any attributes on to the body tag as that is defined in the layout for the "Simple HTML Message" template.

I would need to create my own template.

The Solution

I needed a solution that would allow me to insert content into the "<head>" and "<body>" sections of the email and not have them overwritten by anything that Sitecore does to process the message.  In order to accomplish this, you'll need to create a layout, a 'head' template, a 'head' rendering and XSLT and a message branch as follows:

Layout
I created a new layout to be the base for the responsive template.

Sitecore Responsive Email Layout


The key points of the layout are the two placeholders for the 'head' and 'body' portions of the email.  This allows us to exactly specify what each section should look like.

Sitecore Responsive Email Layout Source


Note: the "msg-target-item" placeholder is required for ECM.

Head Template
In order to allow the layout to display the 'head' template as defined in the email, I had to create an 'inner content' template that would allow the content author to specify the 'head' section. (inherits "/sitecore/templates/System/Templates/Template")

Sitecore Responsive Email Head Template


On this 'head' template, I created a field named "Head" that is of type "Rich Text" and uses "/sitecore/system/Settings/Html Editor Profiles/Message Content" as its source.

Sitecore Responsive Email Head Template


For usability purposes, I added "[Add head section here]" to the "Head" field in the standard values.  This will quickly show the content author where the proper placeholder for the head section is when editing the email in ECM.

Sitecore Responsive Email Head Section Content


"Display Head" XSLT and Rendering
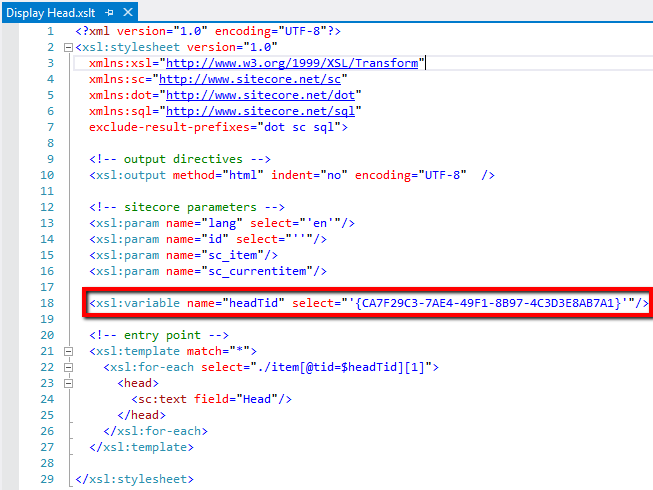
I created an XSLT rendering that would write out the contents of the "head" field from the email.

Sitecore Responsive Email Head XSLT Source


Note that my "headTid" variable contains the value of the template ID of the "Head" template.

I then created a rendering item in Sitecore to reference this XSLT.

Sitecore Responsive Email Head Rendering


Responsive Message Branch

I duplicated the existing "One-Column Message" branch and named it "Responsive Message."  This ultimately provides me with an item that is based on the "AB Test Message" template, which not surprisingly, allows A/B testing.

Sitecore Responsive Email Branch


You can see that I additionally gave the branch a new icon to differentiate it from the other message types, which is a Sitecore best-practice.

Within the "Message Root" item, I removed the "Footer" content item that was copied over from the "One-Column Message" branch and added my new "Head" content item.  I additionally changed the copy contained in the "Body" field of the "Content" content item from "[write your message here]" to "[Provide your responsive HTML here]".

I edited the presentation details to include all the necessary controls

Sitecore Responsive Email Presentation Details


From this, you can see that I have the required "Target Item" and "Process Personalization Tokens" controls in place.  Note: order is important for those at the top and bottom, respectively.  I added my "Display Head" control and set the placeholder to the "msg-head" placeholder.  The "Set Page Title" control takes the title of your ECM email and inserts it into the email that is dispatched.  The "Display Body" takes the "body" section of the ECM email and inserts it.

How to Use the Responsive Email Message Template

After getting all the pieces in place, the only step left is to allow your new branch to show up in the list of available message types when creating a new message.  Navigate to the "default" message type under "One Time Message" and set the insert options to allow the new "Responsive Message" branch.

Sitecore Responsive Email Message Default

Sitecore Responsive Email Insert Options


Note: You will have to do this for each Email Campaign Manger root that you have that needs to use this template.

Also, to ensure that your pretty new template has a pretty thumbnail image to show up in the SPEAK interface, make sure you populate the "Thumbnail" field of the "Appearance" section for your "Responsive Message" branch.

Sitecore Responsive Email Thumbnail


Now, when you choose a "One Time Message", our new template shows up.

Sitecore Responsive Email One Time Message


And while you're editing your message, you can clearly see where to place both the "head" and "body" sections.

Sitecore Responsive Email Head Body Edit


Note: For the CSS that is included in the HTML, I updated the configuration of Sitecore to allow us to store and serve CSS files.

So there is a bit of configuration involved in getting all the pieces together, but it's more time-consuming than difficult and your marketers will love you for it.

What's Next?

Now that I have a simple responsive template that can be used to copy-paste HTML into, I will be advancing this proof of concept to create specific responsive templates that my client can use.  I will take the responsive HTML that is created for these specific templates and implement it into a template that includes placeholders for specific content as demonstrated in this post: Building custom newsletter templates for Sitecore's ECM 2.x.

I'll also get this generic template into the Sitecore Marketplace so that you can simply install it and go.

Additional Reading

Pieter Brinkman's blog post about creating email templates: Sitecore ECM: How to create a e-mail template from Scratch – Part I
Mark Ursino's blog post about managing CSS in the media library: Managing CSS in the Sitecore Media Library
Frank van Rooijen's blog post about creating email templates in ECM 2.x: Building custom newsletter templates for Sitecore’s ECM 2.x 

July 25, 2013

404 Error in ECM When Creating One Time Message

By: Craig Taylor
July 25, 2013

The Problem

ECM 404 Error
Recently, while working on a Sitecore site with ECM 2.1, I ran into an issue in a single environment where I was receiving a 404 error when trying to create a new "One Time Message."

All other environments (DEV, STAGE) were working with no issues.  The page being requested, (/emailcampaign/create/ad hoc messages) was there, just like in the other environments.

The Solution

After troubleshooting for a while, the problem was found in a patch include file for the SitemapXML module.  This module was only being used in Production and that is why the other environments were working.  The module updates the "encodeNameReplacements" node to replace spaces with dashes in an attempt to help with SEO.  This was intercepting the URL request from ECM, modifying it and this prevented Sitecore from finding the requested URL.  To correct this, I simply commented-out the offending configuration:

    <!--<encodeNameReplacements>
      <replace mode="on" find=" " replaceWith="-" />
    </encodeNameReplacements>-->

Watch out, those include files, they will get you.  Use the "admin/showconfig.aspx" page to really be sure what is being included without you realizing it.

April 16, 2013

Sitecore: MVC Error when Running E-mail Campaign Manager 2.0

By: Craig Taylor
April 16, 2013

I was installing E-mail Campaign Manager 2.0 module (ECM) on a fresh install of Sitecore 6.6 (Update 4) the other day and ran into an issue.  The install process itself is easy: Install the SPEAK 1.0 package and then install the ECM 2.0 package.  Everything appeared to install smoothly.  When I logged into Sitecore and went to the ECM dashboard, I saw that it was actually throwing an error.


Note: The new SPEAK interface looks amazing and is *way* nicer than the ECM 1.3.3 version; Nice work, Sitecore!

If installing the ECM module on a remote computer that has the custom errors turned "On" or "RemoteOnly" in the web.config, you will just see that there is a runtime error:

ECM Runtime Error


If you update the web.config on the remote system to turn the custom errors “Off”, or you remote into the machine and browse to your Sitecore site and open up ECM, you will see the details of the error message:

ECM MVC 2.0.0 Error


So it appears as though the E-mail Campaign Manager module has an undocumented requirement to have ASP.NET MVC 2 installed on the server.

Go to http://www.microsoft.com/en-us/download/details.aspx?id=22079 and download the “AspNetMVC2_VS2008.exe” executable.  Run the exe on your Sitecore server and the ECM won’t complain any longer.

Alternatively, if you already have MVC 3 installed on your server, you can do a binding redirect to point any references to the 2.0 version to 3.0: https://gist.github.com/dunston/5213369

Happy email campaigning!