Showing posts with label Sitecore. Show all posts

November 28, 2023

Should I Stay or Should I Go? Why not both?: Planning your Sitecore XM Cloud Migration

By: Craig Taylor
November 28, 2023

Should I Stay or Should I Go? Why not both?: Planning your Sitecore XM Cloud Migration


Should I Stay or Should I Go?

In the last episode, I discussed a crossroads decision point that businesses often find themselves in: stay with an establish platform like Sitecore XP, or migrate to Sitecore XM Cloud. Stuck between two giants in the digital platform space? What if I told you there's a third, equally formidable option? Let me introduce it: both.

Why Not Both?

Hear me out. Migrating to XM Cloud can be a serious undertaking. As I previously suggested, in addition to re-architecting the website and every component, you may want to consider a complete redesign as well. This can be a large pill to swallow for many organizations that haven't already planned for such an expense. A 'dot' upgrade is one thing, but re-architecture, redesign, and redevelopment is much more involved.

What if there was a way to migrate to XM Cloud over time as your budget and capacity allows?  Well, there is. On a recently-launched client project, the client wanted to move to XM Cloud quickly, but didn't have the appropriate budget for the year and didn't want to wait for a 'big bang' at the end of long design and development cycles. As it turns out, Microsoft has a solution we can incorporate to address this issue.

Hello Azure Front Door, you had me at . . . Hello

Azure Front Door is many things, but if you wanted to simplify it for easy comprehension: it's an entry point to your domain. When incorporated, all traffic for your domain gets routed through Azure Front Door and then rules are executed against the incoming request to match for specific patterns. The patterns to match could be from the request path, the domain, the protocol, geo-location, etc.. Actions are assigned to the rule and a match can direct traffic to multiple endpoints (origins).

In the case of our client, we helped them develop a prioritized list of pages to migrate to XM Cloud immediately, and over time we will eventually migrate all approved pages to XM Cloud. The prioritization process involves determining which pages we will keep, which we will modify, and which we will eliminate from the new site. The pages that were not prioritized to move to XM Cloud will continue to live on the Sitecore XP platform as-is. In our case, we modified the XP header and footer to more closely match the header and footer of the newly-designed site to not cause total shock when navigating from XM Cloud to XP pages, but no changes are required to make the XP pages work just as they always have.

When Azure Front Door fields a request for the domain, it is processed by a ruleset. Our rules were configured to look for the XM Cloud pages. If the pattern of the incoming request matches a pattern for a page on the new XM Cloud site, it is directed to the XM Cloud origin. When it does not match, Front Door passes the entire request through to the XP origin. This can all happen using the same domain name so that your users aren't confused.

In this way, we have achieved running both versions of Sitecore concurrently and can complete redesign and redevelopment of the remaining portions of the site as budget and time allow!

Gotchas?

Oh yeah, there are some gotchas, of course.

Depending on how many pages you want to divert to one origin or another, Azure Front Door will handle it gracefully or it will start to choke. Front Door starts to break down as you approach the limit for routing rules. (25 for Standard tier or 50 for the Premium tier) This may sound like plenty, but if you happen to have some redirects in addition to the routing, or want to handle http vs https differently, these add up quickly. What helps here is that you can apply many patterns within a single rule when matching. For example: if the rule states that anyting matching your patterns should just forward on the same request path to the origin specified, you can bundle many patterns together to perform the same action. So if you're clever with how you match and how you redirect, this may not be too much of a limitation, but it's still something to look out for.

Running Sitecore XP and XM Cloud alongside each other is going to have some cost concerns. You're essentially running two websites, with two licenses, with hosting for two sites at the same time. While running both alongside each other will allow you to dip your toes in the water, you may drop your wallet in the lake too.

Conclusion

The decision to upgrade your Sitecore implementation to the latest version of XP or migrate to Sitecore XM Cloud is an important one. You may have thought those were the only two options, but you now you have (at least) one more option. Operating both platforms simultaneously can help get your organization moving towards the Cloud at their own pace. Understand the pros and cons of the options before jumping in is essential to ensure that you're making the right decision for your organization or client.


September 15, 2023

The Evolution of Sitecore Development: Embracing SaaS, Front-End Expertise, and Cheese!

By: Craig Taylor
September 15, 2023


The Evolution of Sitecore Development: Embracing SaaS, Front-End Expertise, and Cheese!

Who Moved My Cheese?!

In the ever-evolving landscape of web development, platforms like Sitecore have played a pivotal role in shaping digital experiences. Traditionally, Sitecore development has relied heavily on backend (usually C#) developers to craft Sitecore solutions. However, with the advent of Sitecore XM Cloud and the shift towards a Software as a Service (SaaS) model, the dynamics of Sitecore development are undergoing a significant transformation. 

I often introduce myself as an architect that has a background in Microsoft technologies, specifically C# and Sitecore.  Moving the focus of Sitecore development towards frond-end technologies sounds like I'm putting myself and other backend devs out of work, but fear not, it doesn't have to be that way. I remember a time where people thought that the introduction of Visual Studio meant that the days were numbered for developers.  You may be thinking now that the same is true when we talk about the evolution of Sitecore development. (well, if you're a backend developer, that is)    

What does this shift mean for traditional, backend Sitecore developers, the increasing importance of frontend developers, and the shift towards a more collaborative, product-focused approach?  I'm glad you asked.

The Shift to Sitecore XM Cloud

  1. Embrace Cheese, I mean, SaaS for Scalability
    Sitecore XM Cloud represents a shift towards a cloud-based, scalable architecture. This move not only simplifies infrastructure management (aint nobody got time for that) but also opens new doors for collaboration between backend and frontend developers. The emphasis on SaaS allows for quicker deployment, reduced maintenance overhead, and a more seamless development process.

  2. The Rise of Front-End Development in Sitecore
    • React and Next.js Integration
      We are flipping staffing models from staffing a 'bunch' of backend developers along with a 'few' frontend developers on its head. As Sitecore (and partners) embrace a more API-first approach, the need for proficient frontend developers has become more pronounced. React and Next.js have become integral components in the Sitecore development toolkit and frontend developers now play a crucial role in shaping the user interface and optimizing the overall user experience.  We aren't forgetting about the backend devs as you will see below.

    • Enhanced Content Delivery
      With a focus on content delivery to the frontend, Sitecore developers are transitioning from being solely backend experts to becoming well-versed in frontend technologies. This shift not only empowers developers to create more interactive and dynamic user interfaces but also facilitates a more collaborative development environment.

The Changing Role of Sitecore Developers

  1. From Code-Centric to Product-Centric
    • Configuring Sitecore for Frontend Integration
      Sitecore developers are no longer just coders; they are becoming product experts who understand the intricacies of configuring Sitecore to seamlessly integrate with frontend technologies. This involves mastering the art of content organization, personalization, and API configurations to ensure a smooth flow of data between the backend and frontend.

    • Collaboration with Frontend Teams
      The lines between backend and frontend development are blurring, and collaboration is key. Sitecore developers now work hand-in-hand with frontend teams, providing them with the necessary tools and data structures to bring digital experiences to life. We can move away from 'The front-end devs have to understand and run Sitecore on their machines' fallacy.  Let's let front-end devs do what they do best.  Let's let Sitecore experts do what they do best.  Let's let them collaborate so they can build build great Sitecore sites. This collaboration fosters a more holistic approach to Sitecore development.

Embrace the Cheese, I mean, Change

The evolution of Sitecore development towards a SaaS model, particularly with Sitecore XM Cloud, marks a shift in the skills and expertise required to develop today's modern websites. While backend Sitecore developers will always be valuable, the demand for frontend developers with React and Next.js experience is on the rise. 

Sitecore developers are no longer confined to the backend; they are evolving into versatile product experts, bridging the gap between backend infrastructure and frontend innovation. We still need backend deveopers to help with the configuration of Sitecore, creation of Sitecore artifacts, devOps processes, integrations, search, gated content, etc. This transformation not only enhances the efficiency of development processes but also results in more dynamic and engaging digital experiences for end-users. 

As the world of Sitecore development continues to evolve, embracing this change is essential for staying at the forefront of digital innovation.

References:

Who Moved My Cheese (We had a training session early in my career where we discussed this book and it's always in my head and I wonder if people look at me like I'm crazy when I mention it.  The book is about embracing change. It talks about a mouse who is mad that his cheese has been moved and he can't let it go.  Instead of focusing on that, embrace the change and learn how to operate while your cheese is in a new location.  I hope this helps to explain why I keep referring to "cheese" in this post.)


November 1, 2019

Syncing TDS content with Sitecore and the Field Content Does Not Match Content-Length Error

By: Craig Taylor
November 1, 2019


Syncing TDS content with Sitecore and the Field Content Does Not Match Content-Length Error
So I recently ran into an issue on a new-to-me project.  The solution was already created, the project team had moved on to other projects and I was tasked with getting a new team ready to make some enhancements. While attempting to sync my Sitecore content with my local instance, I received a TDS error stating:

TDS Content Length Error


This is a known issue when working with TDS and git and the solution to correcting this has been provided earlier by others here and here.  In summary, the solution is to update the .gitattributes file by adding a line with the following:


This works great going forward, but doesn't address the issue you already have.  As both articles mention, the solution is to delete your local TDS files and re-sync.  For my situation, this doesn't work as I don't have the items in my local instance yet and deleting the items on disk would just lose them forever.

The solve is rather manual in nature, but here is what I did:

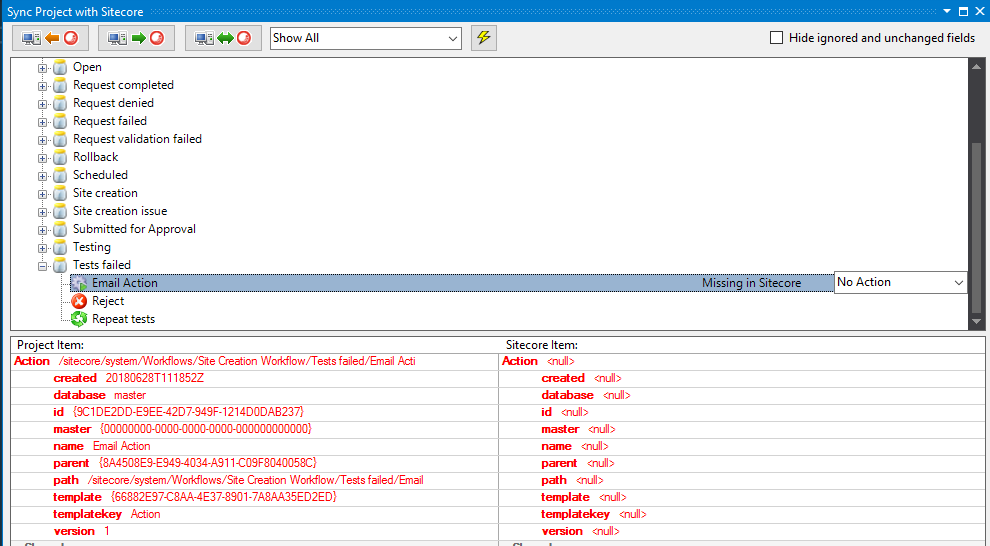
  1. Attempt to sync TDS with Sitecore and make note of all the items that have the error.  In my example, I'm only showing a single line, but you may have many. (as I did before I took this screenshot)

    TDS Sync View
  2. Open the .item file in a text editor.
  3. Take note of the template type of the item and create a new item in Sitecore with the same type. (making sure to create the item with the same name/path as in the item file)
  4. Copy the relevant fields from the .item file and paste them into the proper fields in your new Sitecore item.  In my case, I have an "Action" template item and only care about "Type", "Parameters" and "Security" fields. (Note: You don't have to worry about every field, but you should take care to bring over the important fields to your application.  You can usually ignore fields like "_sortorder", "__owner", "__created", etc.)

    Item View
  5. Save your Sitecore item.
  6. Sync your TDS item to Sitecore from Visual Studio.

Your error is now gone and you can continue on your way.  As mentioned, this can become an extremely tedious process depending on how many items and how many fields you have on your items, but in my case, was a necessary evil. Someone smarter than me could probably develop a script of some kind to address the error on a larger scale, but I'll leave that to the aforementioned smarter people.

References:

Deploying Sitecore Items with Git and TDS (Hans Léautaud from 2014): https://medium.com/sitecore-tips-tricks/deploying-sitecore-items-with-git-and-tds-f6a47605d1b4

Hedgehog TDS - Field Content Does Not Match Content-Length (Corey Smith from 2016): https://www.coreysmith.co/hedgehog-tds-field-content-does-not-match-content-length/

April 12, 2019

Limit TreelistEx Selections to X Number of Items

By: Craig Taylor
April 12, 2019


Sitecore Item Limit

I recently had a requirement to limit the content author's ability to select items.  In this case, they were only allowed to select two items.  I love using "TreeListEx" and therefore selected that field type.  I knew that I could set validation on fields and went about looking for the built-in validator that would limit the number of selections. . . I didn't find it.

While I was surprised to not find this validator, I thought that surely, someone else smarter than me had mentioned it on the interwebs; I was not disappointed.  A quick search yielded a StackOverflow post about it that cited a blog post.  In summary, apply a Regex value to the "Validation" field of your field. (Add a helpful "ValidationText" message while you're at it.)

I dutifully copied and pasted the Regex expression into my field and was a little surprised to see an error message while testing the validator:

Sitecore Validation Error

Well, that didn't go as expected.  After a bit of Internet sleuthing on the error, I found that there might be a character (or "characters") in the string that needs to be escaped.  I simply changed "^({[^}]+}|?){0,2}$" to "^(\{[^}]+\}|\?){0,2}$" (included the escaping 'backslashes' before the curly brackets and question mark) and was on my way!


Sitecore Validation Working

Update: And of course as I'm finalizing the research for this post, I see that Ben *actually* did solve this and it can be seen in the screenshot he included, but the Regex text in his post didn't include the escape characters

November 27, 2018

Sitecore CD Hardening via Release Deployments

By: Craig Taylor
November 27, 2018


Sitecore CD Hardening via Release Deployments

Security hardening on your CD servers is an absolute must.  It should not be an afterthought and you should address it early so that you're not trying to cram it in just before go-live.

In the days before automated deployments, CD hardening would involve manually manipulating the IIS folder level permissions on each CD server in your environments. With automated deployments, we can make this much easier!

Which Sitecore Version are We Deploying?

Take note of which version of Sitecore you are working with.  Prior to Sitecore 8.2, Update 3, you are still limited to manipulating IIS folder level permissions.  You can also handle this with configuration, but that's outside the scope of this post.  With Sitecore 8.2, Update 3 and newer, we have the option of changing the forms authentication mode in order to secure the server.

Disable Forms Authentication

The simple way to disable access to your Sitecore interface is to change the authentication mode from "Forms" to "None" in your web.config:


Easy enough to do on each of your CD servers, right?  But we want to automate that with our deployments.

Azure Devops and Web.config Tranforms

Using a web.config transform, we can target the "authentication" node and change the value to "None." 

What about local development though? 

When developing locally, you can use the "Debug" solution configuration that lets the web.config use the "Forms" setting when developing locally. This is exactly how Sitecore ships out of the box.

Use the "Release" solution configuration to set a transform on that element to change it to a token value.  Note: This assumes you are using the "Release" configuration when building your solution in Azure Devops (was VSTS). 

Why a token value instead of just setting it to "None"? 

We are utilizing (mostly) clean deploys.  When deploying, we wipe the web root and install all of Sitecore and our custom code and configuration from scratch.  Additionally, we deploy the same set of files to every server.  Different values for the tokens are controlled via variables and variable groups in Azure Devops. We expect this token value to be replaced at the time the release is generated and deployed to our different environments.

Putting it Together

So, we have a Web.Release.config file in our solution that looks like this:


In Azure Devops, we have a Variable Group for our CM servers that has the same "#{AuthenticationMode}" token with a value of "Forms":

Sitecore CM Server Role Variables


Additionally, in Azure Devops, we have another Variable Group for our CD servers that has the "#{AuthenticationMode}" token with a value of "None":

Sitecore CD Server Role Variables


When the release is built, use the Replace Tokens task in your release definition to process all your config files and replace the tokens with values from your Azure Deveops Variables Library.

Summary

Security hardening is an important task that shouldn't be overlooked and shouldn't be pushed to the end of your development cycle.  Consider security early and keep yourself and your clients out of the news.

Additional Reading

Sitecore - Deny anonymous users access to a folder

Sitecore - Restrict access to the client

Visual Studio Marketplace - Replace Tokens Task

January 31, 2018

Craig Taylor Wins Sitecore "Most Valuable Professional" Award

By: Craig Taylor
January 31, 2018


Craig Taylor wins Sitecore Most Valuable Professional Award

Atlanta, GA — January, 31st, 2018 — Craig Taylor has been named a "Most Valuable Professional (MVP)" in the Technology category by Sitecore®, the global leader in experience management software. Craig was one of only 208 Technology MVPs worldwide to be named a Sitecore MVP this year.

Now it its 12th year, Sitecore's MVP program recognizes individual technology, strategy, and commerce advocates who share their Sitecore passion and expertise to offer positive customer experiences that drive business results. The Sitecore MVP Award recognizes the most active Sitecore experts from around the world who participate in online and offline communities to share their knowledge with other Sitecore partners and customers.

I'm truly honored that Sitecore recognized me as an MVP in the Sitecore community for the fifth straight year! I'm surrounded by some amazingly talented co-workers at Avanade and supported by an amazing Sitecore community. I feel like I'm in great company and am continually pressed to keep the high standards demonstrated by the other Sitecore MVPs. (Craig Taylor, Sitecore Architect, Avanade Inc.)

"The Sitecore MVP awards recognize and honor those individuals who make substantial contributions to our loyal community of partners and customers," said Pieter Brinkman, Sitecore Senior Director of Technical Marketing. "MVPs consistently set a standard of excellence by delivering technical chops, enthusiasm, and a commitment to giving back to the Sitecore community. They truly understand and deliver on the power of the Sitecore Experience Platform to create personalized brand experiences for their consumers, driving revenue and customer loyalty."

The Sitecore Experience Platform™ combines web content management, omnichannel digital delivery, insights into customer activity and engagement, and strategic digital marketing tools into a single, unified platform. Sitecore Experience Commerce™ 9, released in January 2018, is the only cloud-enabled platform that natively integrates content and commerce so brands can fully personalize and individualize the end-to-end shopping experience before, during, and after the transaction. Both platforms capture in real time every minute interaction—and intention—that customers and prospects have with a brand across digital and offline channels. The result is that Sitecore customers are able to use the platform to engage with prospects and customers in a highly personalized manner, earning long-term customer loyalty.

Craig is a five time Sitecore Technology MVP and is a skilled, senior IT professional with over sixteen years of professional experience in Web technologies. He is an expert in architecting and leading teams in delivering Sitecore CMS solutions. Craig has a consistent record of delivering successful software implementations that are on-time and on-budget.

More information can be found about the MVP Program on the Sitecore MVP site: http://www.sitecore.net/mvp

June 15, 2017

Suppress Cookies for EU Cookie Compliance

By: Craig Taylor
June 15, 2017


Suppress Cookies for EU Cookie Compliance


You've probably seen this already on a number of sites, but increasingly, sites are being required to inform their visitors of the site's cookie policies.  Many implementations that I've seen provide the disclaimer that cookies are being used and that by interacting with the site, the user is providing consent.  My client is going a step further and requires that *no* cookies (except the ASP.NET session cookie) be written to the browser before the user provides consent.

In the case of this client's site, this includes Sitecore's analytics tracking cookie, Sitecore's language cookie (although technically okay to emit because it's only a session cookie) and a host of other tracking cookies emitted from different renderings.

In order to approach this in a way that prevents the need to edit logic across the solution, we came up with a solution that has two primary components:

  1. A Cookie Consent Provider - This provider allows us to interface with a third party system for determining if consent is required, not required or has already been provided.  Additionally, by implementing a provider, we can easily switch out to another provider at some point in the future and not have to re-write logic.  
  2. An MVC filter - By creating an MVC filter that checks for consent, we can simply decorate methods in our controllers to control the emitting of code/cookies without having to affect any logic already contained in those methods.
I'll talk a bit about the primary components and then describe how they all work together to actually suppress the cookies.

Cookie Consent Provider

The provider is based on the standard Microsoft provider model.  I create a base class that all providers will inherit from.  In the base class, I have methods to get and set the user's consent to use cookies.

I won't review the details of my provider implementation but know that it's pretty vanilla with a provider that implements the base class along with the necessary configuration elements in code and the web.config.

MVC Filter

I chose to use an "AuthorizeAttribute" filter to allow me to suppress the execution of controller methods.  The authorize attribute returns a simple "true" or "false" value indicating if the calling method has the required permissions to execute.

The two primary areas to concern ourselves with in the filter are the "AuthorizeCore" and "HandleUnauthorizedRequest" methods.

In "AuthorizeCore", we are checking the need for consent.  It returns a bool value indicating if the current request can be executed.  Also note a bit of tricky logic there regarding the "InvertLogic" parameter.  Basically, I have times when I need to execute the calling method when the result of the "AuthorizeCore" check is false.  By passing in this parameter, I can invert the logic to return the desired results.  In my case, I want to execute a controller rendering that outputs my cookie consent banner when consent is required.  I can just decorate my method with the additional parameter:


In "HandleUnauthorizedRequest" (the code that is executed when "AuthorizeCore" returns "false") we are setting an AuthorizationContext Result.  In my case, we wanted to output an HTML comment that indicates the calling method along with the status so that we could easily confirm that the system is functioning normally when we view the source of the page.

Putting it Together 

As mentioned, the goal here is to suppress cookies from being emitted before the user has given consent.  The two Sitecore-specific cookies that I am blocking are the 'analytics' and 'lang' cookies.  I block these by inserting pipeline processors that check my consent provider.

Note: Always use patch include files and refrain from editing the Sitecore.config file directly.  

It's also worth noting that I have a configurable 'AnalyticsCookiePrefix' parameter that I pass into the "SuppressAnalyticsCookie" processor.  If the cookie name ever changes in the future, we can edit the value in config and not have to touch the code.

In those processors, I make a call to the consent provider to see if I need to suppress the cookies or not.  If I do, I search the current Response and remove the cookies.  If consent has already been provided on a previous request, the code is skipped.

Note: Via Sitecore.Stackexchange, it was recommended that I not disable the Tracker.  I disabled it anyways, because even though it might be legit to have the cookie written on the first load per EU specifications, my client's requirement was that it was not to be written at all until consent is provided.  Additionally, I wanted to avoid editing the web.config file so instead of utilizing the HTTP module method, I wrote a pipeline processor.  (Yeah, I know I edited the web.config with the consent provider . . . )

So the processors take care of the Sitecore-specific cookies that are written.  For any controller methods that end up writing scripts that emit cookies, I simply decorate the method with my Authorize Attribute override and no further code changes are required!

Additional Resources


Ways to block SC_ANALYTICS_GLOBAL_COOKIE from being deployed - Sitecore.stackexchange.com

How to Write a Provider Model

MVC Filters

May 4, 2017

Help! No one can log in!

By: Craig Taylor
May 4, 2017

No one can log into Sitecore; Sitecore Domain deleted.

Oh snap.  It's Friday afternoon at the end of a long week and you get a desperate email from the client indicating that none of the logins for the Sitecore CM server work any longer.  Guess I'll put down the beer from the office kegerator and go look at things. :/

First up: Confirm the CD servers are still running/displaying the site.  Check.

Next: Is the CM server up?  Check; I can see the Sitecore login screen.

Next: Attempt to log into the CM with my admin account: Hmm, not able to log in.

Next: RDP into the CM server to see what's going on.  Able to RDP fine.

Next: Look at the logs.  Come across something interesting/scary:


Err, that doesn't look good.  Someone logged into Sitecore using an admin account and managed to delete the Sitecore domain.  You know, the one that *all* the logins are associated with. . .   So now, no one can log in.

Fortunately, the users themselves are not deleted when a domain is deleted. (https://doc.sitecore.net/sitecore_experience_platform/setting_up_and_maintaining/security_and_administration/users_roles_and_domains/create_and_edit_a_security_domain#_Delete_a_domain)

Before we get into how to solve this, let's talk about a couple of security issues here.

One: It looks like users that clearly don't know what they are doing have access to an admin account where they can do very bad things.  I think it should be a extremely rare exception where a content author needs this level of access.  It takes longer to properly configure security so that content authors can do everything they need to do but don't have access to portions of Sitecore that they don't need, but that's how it should be done.  Sometimes you can't avoid this and have to create some admin accounts for users, but as the logs show us, we don't even know where to point the finger since a 'generic' admin account was used.

Two: DO NOT GIVE CREDENTIALS TO GENERIC ADMIN ACCOUNTS!  If a user 'needs' admin access, make the account tied to that user an admin.  This would at least let us see who made the boo-boo.

Okay, let's solve this.

Restoring last night's database backup could be an option.  (Checks with Devops)  "Oh, the database backup process isn't running properly and we have no backups?  Super."  Side note: Well, at least we found that out now and can fix that.

Somehow hacking in to the database to restore whatever was deleted could be an option.  Hmm, I'm not sure I even want to go there.

Recall that there is a "Domains.config" file in the "App_Config\Security" folder and that the error specifically mentioned modifying it, there might be something there. . . .

After comparing the modified file to a stock Sitecore Domains.config file, it was easy to see that the only thing missing was the line that declared the "sitecore" domain:

I added that line back in and poof!: Everyone can log in again.  A much easier solve than I would have thought for something that appeared to be very scary.

Next step: IMMEDIATELY change the generic admin account credentials and let the users know that they can log in again.

Now, back to that beer. . .

TL;DR: Put the "sitecore" domain declaration back into the "Domains.config" file, drink beer.

February 28, 2017

Sitecore Server Switch

By: Craig Taylor
February 28, 2017

Sitecore Server Switch

One of the most time-consuming aspects of installing and configuring Sitecore is configuring the servers for their specific roles.  Per Sitecore documentation, specific configuration files should be enabled or disabled for a Content Management (CM) server and likewise, specific files should be enabled or disabled for Content Delivery (CD) server.  Failing to configure the servers for their roles can cause Sitecore to not perform as expected.

Note: There are additional roles for server configurations such as Processing, Reporting and Publishing.

Sitecore's ARM templates look to solve this problem in that they can quickly spin up and configure a Sitecore server, but this only works when using Azure PAAS.  For those not using Azure PAAS, manually adjusting the configuration files can be time consuming.

Sitecore Server Switch looks to solve this issue by using PowerShell.  After installing Sitecore on a server, you can run the "Sitecore_Switch_CM_CD_Lucene_Solr.ps1" script to configure a server as a CM server, as a CD server and additionally configure it to utilize either Lucene or Solr indexing.

Sitecore Server Switch currently supports Sitecore 8.0 (all versions) and Sitecore 8.2 Update 2.  More versions are coming soon.

Sources

Sitecore Server Switch GitHub Source
Sitecore Server Switch on the Sitecore Marketplace (coming soon!)

Acknowledgments

Big shout-out to Sarkis Einarsson for his PowerShell scripts that were the base of this project. (http://sitecoreunleashed.blogspot.com/2015/09/sitecore-8-toggle-cd-configuration.html)

Additional Reading

You can also take this to the next level and automate everything.  Check out Patrick Perrone's work into this space with his automation scripts.

Update (03/01/2017)

And of course, how it usually happens, after writing this module and post, I came across this site that has some automation scripts for 8.2 and even includes the ability to configure additional roles: https://bitbucket.org/sitecoreautomationteam/sitecore-automation/wiki/sitecore-environment
Note: I have not tested this.

And I've also been made aware of Michael West's PowerShell scripts as well: https://gist.github.com/michaellwest/d1124a459cb1fb47486f87d488ecfab8

January 23, 2017

Setting Sitecore SQL Server Database Permissions

By: Craig Taylor
January 23, 2017

Setting Sitecore SQL Server Database Permissions

I recently started on a Sitecore 8.2 project and was setting the SQL Server permissions for the SQL user that I had created for Sitecore to use.  The idea here is to provide least-permissions to the user so that it has enough access to work, but not so much access that it is able to do things that it should not be able to. I feel like I spent way too much time looking for the permissions that should be set.  I eventually found what I was looking for in the installation guide for Sitecore! (#rtfm)

In an effort to make sure this information is accessible (read: so that I find it when I forget next time), I've duplicated the content here.

For the "Master", "Web", "Sessions" and "Analytics" databases, select the following permissions:

  • db_datareader
  • db_datawriter
  • public 

For the Core database, select the following permissions:

  • db_datareader
  • db_datawriter
  • public
  • aspnet_Membership_BasicAccess
  • aspnet_Membership_FullAccess
  • aspnet_Membership_ReportingAccess
  • aspnet_Profile_BasicAccess
  • aspnet_Profile_FullAccess
  • aspnet_Profile_ReportingAccess
  • aspnet_Roles_BasicAccess
  • aspnet_Roles_FullAccess
  • aspnet_Roles_ReportingAccess

For all databases:

In addition to assigning the proper roles to your user for the Sitecore databases, you also want to allow the user to execute stored procedures.  For each database, open the "Properties" window, select "Permissions", select your user and select the "Grant" checkbox for the "Execute" permission.

This is all from the 8.2 Update 2 installation guide, which I can't seem to link to due to authentication requirements on http://dev.sitecore.net, but I think the permissions are the same for previous versions of Sitecore as well.

August 11, 2016

Sitecore Config Transforms - Use Replace instead of Remove

By: Craig Taylor
August 11, 2016

Sitecore Config Transforms - Use Replace instead of Remove

I love config transforms.  I love being able to have a single file that can be transformed for any number of my build destinations.  It's much, much better than trying to maintain separate config files for each destination.  Many times, I have config files that should *only* exist on either a CM or CD server.  Originally, I used the "Remove" method to remove the entire contents of a config file like so:


While it doesn't technically break anything, it leads to errors in the logs on Sitecore startup that complain about "Reader is in incorrect state":


The fix is actually really easy.  Instead of removing the entire "sitecore" node in the file, just replace it:

Now Sitecore be all happy.


June 28, 2016

Using Config Transforms to Manage Sitecore Indexes

By: Craig Taylor
June 28, 2016

Using Config Transforms to Manage Sitecore Indexes

In my previous post, I talked about setting up your Solr indexes to use the "SwitchOnRebuildSolrSearchIndex" index type to avoid index downtime.  In that post, I mentioned that I was using Config Transforms in order to manage the configuration settings across my different environments.  Here's a quick example of how to set up an index for the different environments:

The 'Default' or 'Standard' Index configuration that I have in my solution:

What's going on?:

  • I have separate configurations for "Web" vs "Master" databases. This configuration is for the "Web index. 
  •  I'm using the 'onPublishEndAsync' indexing strategy since this is my "Web" database.  This tells Solt to update the index when a publish is complete.

I then "Add Transform" in Visual Studio to create the specific versions for the other environments.

Note: In order to add the tranformations, you have to have separate solution configurations configured for each environment.

I'll skip all my local/dev/qa/stage environments and just show what I've got for production, but note that each environment can and usually *should* have its own transformation.

Production CM server configuration:

What's going on?:

  • I tell the transform to look for all indexes in the parent config file and change the index type to "SwitchOnRebuildSolrSearchIndex."  I like to keep only one index per configuration file, but if you had multiple indexes defined, this will change all of them.
  • I'm inserting the "rebuildcore" parameter into the index configuration.  This is required so that Sitecore knows which Solr core to swap to after the rebuild is complete.  It's also very important that it goes in in the third position as Sitecore expects it there.

When the transformation is applied, it looks like this:

For the Production CD server, I have the following transform:

What's going on?:

  • As with the CM server, I'm changing the index type to "SwitchOnRebuildSolrSearchIndex", but as you will see with the next point, it doesn't really matter.
  • We are setting the index strategy to "manual."  Our Solr indexes are centrally located on another server and we want the indexing to only happen once.  The rebuilding of the indexes are controlled by the actions of the CM server.
Setting up different configurations based on environment is easily accomplished using config transforms.  It keeps your configuration files clean and easy to manage.


June 18, 2015

Sitecore 8 Bug: Link Sets Anchor Target to Active Browser

By: Craig Taylor
June 18, 2015

Links be broke
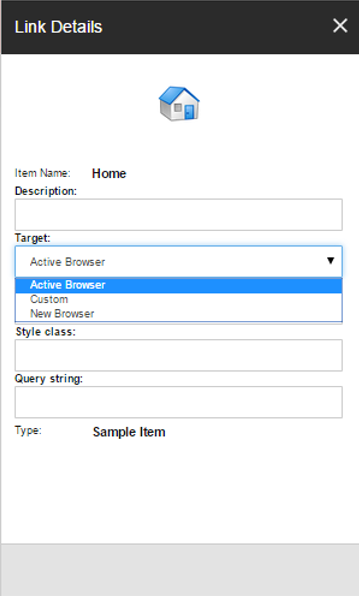
We recently ran into an issue while trying to render links set in Sitecore 8 (Update 3, to be specific).  When using the "General Link" field to insert a link, we discovered that the "target" options for the link were incorrect.  The options provided out of the box were "Active Browser", "Custom" and "New Browser":

Original Link Target Options


One would assume that "Active Browser" would set the target of the anchor tag to "_self" or "_top" so that it opens in the same window.  Unfortunately, what happens is that Sitecore literally puts "Active Browser" in the target attribute, which is not valid and ends up actually opening a new window/tab.

Workaround/Fix

I opened a support ticket with Sitecore and they acknowledged this as a bug and it should be fixed in a future release.

In the meantime, you can adjust the settings of the "Link Details" box to display new target options as follows:

  1. In the "Core" database, navigate to the "/sitecore/client/Applications/Dialogs/InsertLinkViaTreeDialog/PageSettings/TargetsSearchPanelConfig" item.
  2. In the "Root" field of the "Filters" section, specify the "sitecore/client/Business Component Library/System/Texts/Targets" item. (default is "sitecore/client/Applications/Dialogs/InsertLinkViaTreeDialog/PageSettings/Targets")
Now, when you insert a link, you see target options that will work when rendered in the browser: "_blank", "_parent" and "_top":

Updated Link Target Options
Note: If you already had links set to "Active Browser", leaving the default of "SelectTarget" will still render the target as "Active Browser."  You need to open the "Insert Link" option, select "Insert" and then save the item for it to use the proper value.

May 22, 2015

Map a Drive to your Solution Folder to Avoid the File Name Length Error in TDS

By: Craig Taylor
May 22, 2015

Map a Drive to your Solution Folder to Avoid the File Name Length Error in TDS

I recently came across an article that was posted on Twitter about overcoming the dreaded 'File Name Length Error' in Team Development for Sitecore (TDS).

The article makes users aware of a built-in feature of TDS that allows you to use name aliases to overcome length issues.  In my experience, this generally works, but there are always times down the road where no amount of short aliases help due to the nested structure of your Sitecore solution combined with where you save your Visual Studio solution files on your dev machine.

What I like to do is map a drive to my solution files.  This takes my path from "C:\Users\ctaylor\Documents\Visual Studio 2013\Projects" to "Z:\".

I haven't seen the error in a while, but should I encounter it in the future, I can additionally utilize the alias feature of TDS.

March 28, 2015

Restore Access to an Administrator Account

By: Craig Taylor
March 28, 2015


For additional security, one of the first things I do when beginning work on a new Sitecore site is to remove the 'standard' "admin\b" account and instead create a new admin account with a different name (and password, of course!).  After doing this recently, we ran into a problem when the password for the new account was . . . lost.

Existing Functionality

There are some Sitecore tools designed to help manage accounts and access when the administrator user is unable to log in.  Unfortunately, the tools both assume that the user you are using is the 'standard' "admin" account and also that you haven't lost the password, but instead have been locked out of the account.  See John West's post regarding some common ways to get back in.

As John mentions, when the administrator password has been lost, you can simply log in with another account with administrator access in order to reset the password of the first account.  In our case, we only had one administrator account and had no way to get in otherwise.

The solution is to modify an existing tool.

Modify the "unlock_admin.aspx" Page

The "unlock_admin.aspx" page can be found at "/sitecore/admin/unlock_admin.aspx"  Unsurprisingly, the purpose of this page is to unlock the "sitecore\admin" account.  What we need to do is use this page to grab our admin user and reset the password.  The existing code only unlocks the locked admin account:

Membership.GetUser("sitecore\\admin").UnlockUser();
You can instead replace this with code that will set a password on any account in Sitecore:

MembershipUser mu = Membership.GetUser("sitecore\\[Your Administrator Account]");
mu.ChangePassword(mu.ResetPassword(), "[Your New Password]");

This code takes advantage of the .NET membership provider in order to change the password of the account specified.  Enable the button, view the page in the browser, click the button and you're done!  The password is changed and you can now log back in!

Just try not to lose the password this time.

Note: As John mentions in his post, always remember to go back and disable the 'unlock' button.  Also, while I have provided a solution that resets an administrator account password, please don't deploy this file.  It should only be used temporarily to get back into Sitecore.

February 23, 2015

Cascading Renderings in Sitecore 8

By: Craig Taylor
February 23, 2015

Cascading Renderings in Sitecore 8

I have a client that has a need to have managed content within their navigational menu.  We were able to dynamically insert placeholders and control the datasources for the renderings inserted.  When we went to another page in the site, we realized that the renderings we inserted were only associated with the original page instead of the entire site as we intended.  We needed to cascade the renderings down to all the subpages.

It's been done before

There are already some great starting points out there from Alex Shyba and Pavel Veller.  Alex originally wrote about it and Pavel updated the code to work with MVC.  Thanks guys!

One small change

With Sitecore 8 comes the idea of Versioned Layouts.  Since we can now have a shared and final layout, the code should be updated to check the "FinalLayoutField" so that we have access to any renderings added using the Experience Editor.

Field layoutField = parent.Fields[FieldIDs.LayoutField];
needs to be changed to:

Field layoutField = parent.Fields[FieldIDs.FinalLayoutField];

December 17, 2014

Create a Custom Condition in Sitecore 7.1+

By: Craig Taylor
December 17, 2014

Custom Sitecore Condition
A while back, I wrote a blog post on Creating an HTTP Referrer Condition in Sitecore 6.6.  I actually referenced that same post recently when attempting to create a custom condition in Sitecore 8.  To my surprise, things have changed a bit.  I had to backtrack a bit, but discovered that the process for implementing custom conditions that show under a custom section title in the personalization interface actually changed in 7.1.

The process for creating the custom condition in code has remained the same, but the way in which you insert that condition into Sitecore has been updated.  Let's walk through how to create and use a custom condition in Sitecore 7.1 through at least Sitecore 8.

Why Create a Custom Condition?

There are a number of built-in conditions that can be used in order to personalize Sitecore components.  Sometimes however, you run across a client that has needs that extend beyond those of the pre-canned conditions.

Create a new Tag

Create a new Tag item at "\sitecore\system\Settings\Rules\Definitions\Tags".

Create new tag

We will later be associating this tag with our custom Element Folder.  For our purposes, I named the tag "Client Name".

Add Your Tag to the Conditional Renderings

Once your tag is created, you want to associate it with the conditional renderings.  This ultimately allows your custom conditions to be displayed when attempting to peronalize a component.

Add the new tag to the "Default" Tag Definition item at \sitecore\System\Settings\Rules\Conditional Renderings\Tags\Default." Specifically, you want to include your tag in the "Tags" field of the "Taxonomy" section of the "Default" Tag Definition item.

Add new tag to default tag definition

Create a New Element Folder

The name of your Element Folder will be the name of the grouping of conditions that you create.  You can break out your conditions based on the type of condition but I find it more beneficial for clients to just create an Element Folder that is named after the name of the client.  This allows the client easy access to all their custom conditions.

Create new element folder

After creating your Element Folder, associate the Tag created earlier so that our folder will show when attempting to personalize a component.

Select tag

Create your Condition

Once you have your Element Folder, you need to create your custom condition.  As mentioned, this part remains the same as in previous versions where you write custom code to perform some action that returns a boolean value that Sitecore can test against.

Instead of duplicating this code, I'm going to create a test condition under my "Client Name" Element Folder in order to demonstrate the functionality.

Create test condition

Note: You would ordinarily have some more complex text that would allow users to select different operators to test conditions.  You would also specify the type of your custom condition.

Personalize!

We've done all the configuration work and now we just want to take advantage of the custom condition.  Open the Experience/Page Editor and choose a component to personalize.  After choosing "Create/edit the personalization options for this component" button, click "New Condition".  Give your condition a name and select "Edit" to find the condition you created.

Personalize your component

And there you have it.  We created a custom condition and configured Sitecore to be able to show it under a custom Element Folder so that content author have easy access to it.