December 17, 2014

Create a Custom Condition in Sitecore 7.1+

By: Craig Taylor
December 17, 2014

Custom Sitecore Condition
A while back, I wrote a blog post on Creating an HTTP Referrer Condition in Sitecore 6.6.  I actually referenced that same post recently when attempting to create a custom condition in Sitecore 8.  To my surprise, things have changed a bit.  I had to backtrack a bit, but discovered that the process for implementing custom conditions that show under a custom section title in the personalization interface actually changed in 7.1.

The process for creating the custom condition in code has remained the same, but the way in which you insert that condition into Sitecore has been updated.  Let's walk through how to create and use a custom condition in Sitecore 7.1 through at least Sitecore 8.

Why Create a Custom Condition?

There are a number of built-in conditions that can be used in order to personalize Sitecore components.  Sometimes however, you run across a client that has needs that extend beyond those of the pre-canned conditions.

Create a new Tag

Create a new Tag item at "\sitecore\system\Settings\Rules\Definitions\Tags".

Create new tag

We will later be associating this tag with our custom Element Folder.  For our purposes, I named the tag "Client Name".

Add Your Tag to the Conditional Renderings

Once your tag is created, you want to associate it with the conditional renderings.  This ultimately allows your custom conditions to be displayed when attempting to peronalize a component.

Add the new tag to the "Default" Tag Definition item at \sitecore\System\Settings\Rules\Conditional Renderings\Tags\Default." Specifically, you want to include your tag in the "Tags" field of the "Taxonomy" section of the "Default" Tag Definition item.

Add new tag to default tag definition

Create a New Element Folder

The name of your Element Folder will be the name of the grouping of conditions that you create.  You can break out your conditions based on the type of condition but I find it more beneficial for clients to just create an Element Folder that is named after the name of the client.  This allows the client easy access to all their custom conditions.

Create new element folder

After creating your Element Folder, associate the Tag created earlier so that our folder will show when attempting to personalize a component.

Select tag

Create your Condition

Once you have your Element Folder, you need to create your custom condition.  As mentioned, this part remains the same as in previous versions where you write custom code to perform some action that returns a boolean value that Sitecore can test against.

Instead of duplicating this code, I'm going to create a test condition under my "Client Name" Element Folder in order to demonstrate the functionality.

Create test condition

Note: You would ordinarily have some more complex text that would allow users to select different operators to test conditions.  You would also specify the type of your custom condition.

Personalize!

We've done all the configuration work and now we just want to take advantage of the custom condition.  Open the Experience/Page Editor and choose a component to personalize.  After choosing "Create/edit the personalization options for this component" button, click "New Condition".  Give your condition a name and select "Edit" to find the condition you created.

Personalize your component

And there you have it.  We created a custom condition and configured Sitecore to be able to show it under a custom Element Folder so that content author have easy access to it.


November 19, 2014

Sitecore Tip: Set a Custom Desktop Background

By: Craig Taylor
November 19, 2014

Custom Sitecore Background
When I work on a new project, oftentimes one of the first things I'll do after getting Sitecore running is to create custom desktop backgrounds for each environment.  This really comes in handy as I switch between environments and lose track of where I am. (dev, stage, prod, etc)

It's very simple to change the desktop background and based on the feedback I've received from other developers, it's something that is often overlooked.

Create a New Background Image

The easiest way to create a new image is to take an existing Sitecore background from "/sitecore/shell/Themes/Backgrounds" and edit it to include whatever text or identifiers will help you differentiate it from the other environments.  In my case, I just borrowed the "Blue.jpg" image and added my text.

Save the Image

A bit of a spoiler from the 'create' section above as to where to save the image, but save it to the 'backgrounds' directory at "/sitecore/shell/Themes/Backgrounds."

Change the Background Image

There are actually two ways to change the desktop background image.
  1. Log into Sitecore using the "Desktop" interface, right-click on the desktop, choose "Properties" and then select your new image.
  2. Log into Sitecore using the "Desktop" interface, click the "Sitecore" button, choose "Control Panel", choose "Preferences", click "Change Your Desktop Background" and then select your new image.
Note that changing the background only changes it for the current user.  All your other users are free to use whichever background suits them.

So as you can see, it's a super-simple way of giving you an additional cue to which environment you are about to install that potentially unstable package to . . .

October 23, 2014

Injecting a Tracking Pixel into Sitecore's Email Campaign Manager

By: Craig Taylor
October 23, 2014

You can't escape the tracker. Source: https://flic.kr/p/7Eru61
Recently, I had a client request that I provide the ability to insert a tracking pixel into their Email Campaign Manger (ECM) emails.  The purpose of the tracking pixel is to allow a third party to collect information from the recipients and collate that data with data from other clients in order to get a better view of recipients across clients and brands anonymously.

Requirements

The requirements were pretty minimal and are as follows:

  • The tracking pixel includes several parameters that are built into the SRC of the image tag that is created.  One of the parameters is a hashed string of the recipient's email address for anonymous tracking purposes.  The implementation must provide the ability for the content author to change these parameters at design time via the Page Editor.
I additionally added a requirement of my own:
  • Avoid having to create a separate layout that would only be used when wanting to include the tracking pixel in an email.  The content authors should be allowed to create emails as they would ordinarily and if a requirement arises for the email to include a tracking pixel, they should be able to add one with ease.

Implementation Options

While researching options for this project, I came up with two possible approaches:

  1. Create a rendering that would handle the insertion of the tracking pixel into the body of the email.
  2. Hook into the subscriber:assigned event of ECM in order to inject content into the body of the message.

Implementation 

I decided to create a rendering that could be included in an email at design time.  This allows the content authors the ability to decide when and if a tracking pixel will be included in an outgoing email.  Had I tried to hook into the subscriber:assigned event, I would be running logic for each outgoing message that would determine whether to insert a tracking tag or not.  This logic would run even for those messages that did not contain a tracking pixel and would only slow down the dispatch process.

My solution consists of a number of Sitecore items and files that interact to get the tracking pixel populated and inserted into the email.  Basically, the implementation can be broken down into these steps:

  1. Update the placeholder settings for a placeholder in our ECM layout so that we can insert the tracking pixel into.
  2. Write a rendering that outputs the tracking pixel to the email.
  3. Create a patch include file to store configuration for the rendering and that creates a new pipeline processor.
  4. Write a pipeline processor to populate the tracking pixel with custom data based on the current recipient.

Update the Placeholder Settings to Allow the "TrackingPixel" Rendering

I had previously written a Responsive Email Template for my client that is now being used for every outgoing email.  I updated the existing "msg-body" placeholder setting to allow for the "Tracking Pixel" rendering.

Placeholder Settings

Write a Rendering that Outputs the Tracking Pixel to the Email

The rendering is where the HTML for the tracking pixel is created.  The pipeline processor later fills in individual values per email, but the static portion of the pixel is inserted here.
public class TrackingPixel : ClientBaseControl
    {
        #region Rendering Parameters

        public string CampaignId { get; set; }
        public string SiteId { get; set; }
        public string PlacementId { get; set; }
        public string ADGroupId { get; set; }
        public string CreativeId { get; set; }

        #endregion

        protected override void CreateChildControls()
        {
            // Ensure the tracking token and src are defined
            Assert.IsNotNullOrEmpty(Sitecore.Configuration.Settings.GetSetting("TrackingPixelSource"), "Tracking pixel source not defined in config file");
            Assert.IsNotNullOrEmpty(Sitecore.Configuration.Settings.GetSetting("TrackingPixelToken"), "Tracking pixel token not defined in config file");

            // Add a visual representation of the control to allow the content author to edit the tracking pixel parameters
            if (Sitecore.Context.PageMode.IsPageEditor || Sitecore.Context.PageMode.IsPageEditorEditing)
            {
                HtmlGenericControl div = new HtmlGenericControl("div");
                div.Attributes.Add("style", "background-color:red; width:150px;display: inline-block;color:white");
                div.InnerText = "TRACKING PIXEL";
                this.Controls.Add(div);
            }

            // Create the tracking pixel image
            HtmlImage image = new HtmlImage();
            image.Attributes.Add("height", "1");
            image.Attributes.Add("width", "1");
            image.Attributes.Add("border", "0");

            // Get the values of the token and SRC of the tracking pixel from the config file
            string src = Sitecore.Configuration.Settings.GetSetting("TrackingPixelSource");
            string anToken = Sitecore.Configuration.Settings.GetSetting("TrackingPixelToken"); 
            image.Attributes.Add("src", String.Format(src, CampaignId, SiteId, PlacementId, ADGroupId, CreativeId, anToken));

            // Add the tracking pixel to the page
            this.Controls.Add(image);
        }
    }

To (briefly) walk you through the code above, we create some public variables to hold rendering parmeters that are to be passed in, we create the rendering output, we ensure that the configuration file is present, we check for page editor mode, we create the HtmlImage element that is the pixel tracker, we format the pixel tracker and we add the pixel tracker to the page.

Note: Because the tracking pixel is essentially a hidden element, we want to ensure that we can edit this in the page editor.  I check for the page editor mode and upon finding it, display a slightly obnoxious red div element that can be selected by a content author for editing purposes.  This especially comes in handy when you need to select the rendering to change the rendering parameters.  When the email is sent, this div is not displayed.

The Page Editor-only mode of the tracking pixel.

Create a Patch Include File to Store Configuration for the Rendering and that Creates a New Pipeline Processor

To maximize code reuse and to allow for a potential future implementations of different vendors of tracking pixels, I store the SRC of the tracking pixel in a patch include file.  I additionally store the placeholder token string that will be replaced by the hashed string value of the recipient email address.

<setting name="VendorName_TrackingPixelSource" value="http://vendorname.com/pixel/3964/?%26col={0},{1},{2},{3},{4}%26id={5}" />

<setting name="VendorName_TrackingPixelToken" value="**HASHED_EMAIL**" />

The configuration file also creates a pipleline processor that is used to populate the tracking pixel rendering.  This processor runs as the first step of ECM's SendEmail pipeline as follows:
    <pipelines>
      <SendEmail>
        <processor type="Client.Division.Common.PipelineProcessors.PopulateTrackingPixel, Client.Division.Common" x:before="*[1]" />
      </SendEmail>
    </pipelines>

Write a Pipeline Processor to Populate the Tracking Pixel with Custom Data Based on the Current Recipient

The pipeline processor is injected into the "SendEmail" ECM pipeline.  It accepts the "SendMessageArgs" arguments and as part of those arguments, it contains the "MailMessageItem" object.  This object is where we can get access to the 'body' and 'to' fields of the outgoing email.

class PopulateTrackingPixel
    {
        public void Process(SendMessageArgs args)
        {
            Assert.ArgumentNotNull(args, "args");
            MailMessageItem message = args.EcmMessage as MailMessageItem;
            
            if (message != null)
            {
                if (!String.IsNullOrEmpty(message.Body))
                {
                    // Ensure the tracking token and src are defined
                    Assert.IsNotNullOrEmpty(Sitecore.Configuration.Settings.GetSetting("TrackingPixelToken"), "Tracking pixel token not defined in config file");

                    // Find the placeholder and replace with the tracking pixel
                    string anToken = Sitecore.Configuration.Settings.GetSetting("TrackingPixelToken"); 

                    args.EcmMessage.Body = message.Body.Replace(anToken, EmailUtil.HashEmailAddress(message.To));
                }
            }
        }
    }

We want the 'body' so that we can take the content, which now contains our tracking pixel rendering, and replace the "**HASHED_EMAIL**" string with an actual hashed email string based on the actual recipient.  We take the "to" and pass that into a custom "HashEmailAddress" method, which returns the hashed email address.

Other Relevant Artifacts

Rendering Parameters

The tracking pixel requires some additional parameters to be passed back to the third party tracking company that further identifies things like "campaignID", "siteID", "placementID", etc.  These are set when the content author places the rendering on the page so that they can be unique to each email campaign.

Email Utility Class

The email utility class contains methods common to email-related tasks.  In this case, I created a couple of methods to allow the hashing of email addresses.

How it's Used

Adding a tracking pixel to an ECM email is now easy with the tracking pixel artifacts in place.  A content author creates an email, uses the "add a new component" icon in the ECM ribbon, adds the tracking pixel rendering to the proper placeholder, supplies parameters via the rendering parameters popup and boom, tracking pixels on all outgoing emails.

Whether it's a tracking pixel or some other form of customized code that you need injected into your emails, I hope this helps!

July 15, 2014

Publishing to a Sitecore Failover Server

By: Craig Taylor
July 15, 2014

Failures happen. Source: https://flic.kr/p/aeZWUY
When designing the architecture for a highly-available website, you will want to have failover servers configured in case other servers start smoking.  This is where 'failover' servers come into play.

Failover Options

Failover configurations can either be 'cold', 'warm' or 'hot'.

These different levels of failover range from having to manually copy up data and web files when a failure happens to having the servers automatically switch over to your failover server that already has all the latest data and files in the case of a failure.  Sitecore has different licensing options depending on what you want to do, so ensure that you are licensed for your particular implementation.

A common approach would utilize SQL Server mirroring to synchronize the content, but there is another approach that can use basic Sitecore publishing to achieve the same results.

Configuring a Failover Server for Sitecore

In this example, we are assuming that the configuration being used is a 'hot' failover in which the failover system always maintains the most-recent Sitecore data.  We can utilize Publishing Targets in order to keep the failover server in sync with the production content for your site.

Create a Publishing Target in Sitecore
In the Sitecore Content Editor, simply navigate to "\sitecore\System\Publishing targets" and insert a new "Publishing target" item.  I have named my target database "Failover."

Sitecore Failover Server Publishing Target.


Now, we need to add the database reference to the web.config.  Instead of editing the web.config directly, I have created a patch include file in order to keep the config isolated.

<configuration xmlns:patch="http://www.sitecore.net/xmlconfig/">
  <sitecore>
    <databases>
      <database id="failover" singleinstance="true" type="Sitecore.Data.Database, Sitecore.Kernel">
        <param desc="name" />$(id)
        <icon>Network/16x16/earth.png</icon>
        <securityenabled>true</securityenabled>
        <dataproviders hint="list:AddDataProvider">
          <dataprovider param1="$(id)" ref="dataProviders/main">
            <disablegroup>publishing</disablegroup>
            <prefetch hint="raw:AddPrefetch">
              <sc .include="" file="/App_Config/Prefetch/Common.config">
              <sc .include="" file="/App_Config/Prefetch/Web.config">
            </sc></sc></prefetch>
          </dataprovider>
        </dataproviders>
        <proxiesenabled>false</proxiesenabled>
        <proxydataprovider param1="$(id)" ref="proxyDataProviders/main">
        <archives hint="raw:AddArchive">
          <archive name="archive">
          <archive name="recyclebin">
        </archive></archive></archives>
        <cachesizes hint="setting">
          <data>20MB</data>
          <items>10MB</items>
          <paths>500KB</paths>
          <itempaths>10MB</itempaths>
          <standardvalues>500KB</standardvalues>
        </cachesizes>
      </proxydataprovider></database>
    </databases> 
  </sitecore>
</configuration>


Don't forget that we need to specify a connection string for the failover database.  Edit your "connectionstrings.config" file and add the additional "failover" database connection string.  Ideally, this server/database is located in a different physical location from your other production databases.

To ensure that the data is always kept up-to-date, we need to ensure that the content authors always publish to the failover database.  Again, I include this functionality in a patch include file.

<configuration xmlns:patch="http://www.sitecore.net/xmlconfig/">
  <sitecore>
    <settings>
      <setting name="DefaultPublishingTargets" value="Internet|Failover" />
    </settings>
  </sitecore>
</configuration>


Since the database is always selected via the "DefaultPublishingTargets" attribute and because the basic author roles of the site have no permissions to edit the publishing targets, there is no way for the content author to avoid publishing to this database.

Hopefully, you'll never need it, but now your failover environment will have all the latest content from your production website!

April 3, 2014

Creating a Responsive Email Template for Sitecore's ECM 2.x

By: Craig Taylor
April 3, 2014

Creating a Responsive Email Template for Sitecore's ECM
My client has been using Sitecore's Email Campaign Manager (ECM) for a while now and all of their emails have used the 'standard' default templates, with most of them using the "Simple HTML Message" template. (Note: I'm using "template" in a generic sense here, and am not talking about a Sitecore data template)  As their new sites designs began to incorporate Responsive Web Design (RWD) methodologies, the question of if ECM could handle responsively-designed emails came up.

The Problem

I didn't see why the 'standard' templates wouldn't work with RWD, so I attempted to paste the entire responsive HTML into the template.  What I quickly found was that pasting HTML into the "body" field of the simple HTML template rendered everything within a "<body>" tag.  This means that I can't add my own code to the "<head>" section as that is already defined in the layout that is utilized by the "Simple HTML Message" template.  Furthermore, I couldn't put any attributes on to the body tag as that is defined in the layout for the "Simple HTML Message" template.

I would need to create my own template.

The Solution

I needed a solution that would allow me to insert content into the "<head>" and "<body>" sections of the email and not have them overwritten by anything that Sitecore does to process the message.  In order to accomplish this, you'll need to create a layout, a 'head' template, a 'head' rendering and XSLT and a message branch as follows:

Layout
I created a new layout to be the base for the responsive template.

Sitecore Responsive Email Layout


The key points of the layout are the two placeholders for the 'head' and 'body' portions of the email.  This allows us to exactly specify what each section should look like.

Sitecore Responsive Email Layout Source


Note: the "msg-target-item" placeholder is required for ECM.

Head Template
In order to allow the layout to display the 'head' template as defined in the email, I had to create an 'inner content' template that would allow the content author to specify the 'head' section. (inherits "/sitecore/templates/System/Templates/Template")

Sitecore Responsive Email Head Template


On this 'head' template, I created a field named "Head" that is of type "Rich Text" and uses "/sitecore/system/Settings/Html Editor Profiles/Message Content" as its source.

Sitecore Responsive Email Head Template


For usability purposes, I added "[Add head section here]" to the "Head" field in the standard values.  This will quickly show the content author where the proper placeholder for the head section is when editing the email in ECM.

Sitecore Responsive Email Head Section Content


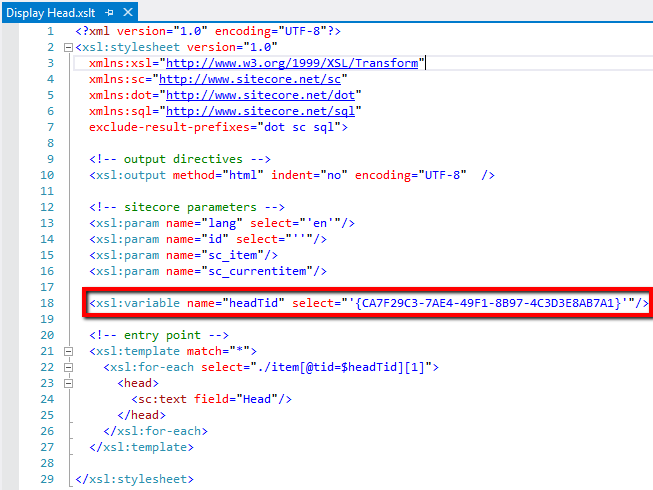
"Display Head" XSLT and Rendering
I created an XSLT rendering that would write out the contents of the "head" field from the email.

Sitecore Responsive Email Head XSLT Source


Note that my "headTid" variable contains the value of the template ID of the "Head" template.

I then created a rendering item in Sitecore to reference this XSLT.

Sitecore Responsive Email Head Rendering


Responsive Message Branch

I duplicated the existing "One-Column Message" branch and named it "Responsive Message."  This ultimately provides me with an item that is based on the "AB Test Message" template, which not surprisingly, allows A/B testing.

Sitecore Responsive Email Branch


You can see that I additionally gave the branch a new icon to differentiate it from the other message types, which is a Sitecore best-practice.

Within the "Message Root" item, I removed the "Footer" content item that was copied over from the "One-Column Message" branch and added my new "Head" content item.  I additionally changed the copy contained in the "Body" field of the "Content" content item from "[write your message here]" to "[Provide your responsive HTML here]".

I edited the presentation details to include all the necessary controls

Sitecore Responsive Email Presentation Details


From this, you can see that I have the required "Target Item" and "Process Personalization Tokens" controls in place.  Note: order is important for those at the top and bottom, respectively.  I added my "Display Head" control and set the placeholder to the "msg-head" placeholder.  The "Set Page Title" control takes the title of your ECM email and inserts it into the email that is dispatched.  The "Display Body" takes the "body" section of the ECM email and inserts it.

How to Use the Responsive Email Message Template

After getting all the pieces in place, the only step left is to allow your new branch to show up in the list of available message types when creating a new message.  Navigate to the "default" message type under "One Time Message" and set the insert options to allow the new "Responsive Message" branch.

Sitecore Responsive Email Message Default

Sitecore Responsive Email Insert Options


Note: You will have to do this for each Email Campaign Manger root that you have that needs to use this template.

Also, to ensure that your pretty new template has a pretty thumbnail image to show up in the SPEAK interface, make sure you populate the "Thumbnail" field of the "Appearance" section for your "Responsive Message" branch.

Sitecore Responsive Email Thumbnail


Now, when you choose a "One Time Message", our new template shows up.

Sitecore Responsive Email One Time Message


And while you're editing your message, you can clearly see where to place both the "head" and "body" sections.

Sitecore Responsive Email Head Body Edit


Note: For the CSS that is included in the HTML, I updated the configuration of Sitecore to allow us to store and serve CSS files.

So there is a bit of configuration involved in getting all the pieces together, but it's more time-consuming than difficult and your marketers will love you for it.

What's Next?

Now that I have a simple responsive template that can be used to copy-paste HTML into, I will be advancing this proof of concept to create specific responsive templates that my client can use.  I will take the responsive HTML that is created for these specific templates and implement it into a template that includes placeholders for specific content as demonstrated in this post: Building custom newsletter templates for Sitecore's ECM 2.x.

I'll also get this generic template into the Sitecore Marketplace so that you can simply install it and go.

Additional Reading

Pieter Brinkman's blog post about creating email templates: Sitecore ECM: How to create a e-mail template from Scratch – Part I
Mark Ursino's blog post about managing CSS in the media library: Managing CSS in the Sitecore Media Library
Frank van Rooijen's blog post about creating email templates in ECM 2.x: Building custom newsletter templates for Sitecore’s ECM 2.x 

February 5, 2014

Sitecore Clean Up Databases Tool Fails

By: Craig Taylor
February 5, 2014

Sitecore Clean Up Databases Tool Fails
We recently ran into an issue with a custom agent that we wrote for a client.  The agents job is to automatically sync images in a network location with those in the Sitecore media library.  The agent runs on a set schedule and was working great until the DBAs noticed that our Sitecore databases were consuming massive amounts of disk space.  Upon further examination, both the 'master' and 'web' databases were in excess of 700 GB.

The Problem

The master and web databases were growing at an exponential rate and the times of growth were tied to when our custom agent was processing.  We were quickly running out of disk space on our database servers.  I looked at the size of the images contained in the sync folder and knew that it should only be about 10GB.  It looked like Sitecore was maintaining old blob records.  I knew that Sitecore provided a "Clean Up Databases" (Sitecore 6.6) utility under "Control Panel\Database" to help with exactly this type of problem.

"Clean Up Databases" allows you to select the database(s) you would like to 'clean' and performs the following actions: (thanks to @DanSolovay and http://bit.ly/1fMv2mF)
  1. Removes items that have parents, but the parents are not in the item tree.
  2. Removes invalid language data.
  3. Removes fields for non existing items.
  4. Removes orphaned items.
  5. Removes unused blob records.
  6. Removes fields from orphaned items removed in step 4.
  7. Rebuilds the Descendants table (which stores parent/child relationships).
  8. Clears all caches.
I was interested in was removing the unused blob records that were apparently sticking around.  I ran the utility and let it go.  It ran and ran and ran.  I continued to check on the utility and could see that the size of the blobs table was slowing returning to a 'normal' size.  After 6 hours, I saw that an exception was thrown and that SQL Server then backed-out of the transaction, returning the database to the pre-clean up size.  After opening up the logs, I could see that the error was:

Exception: System.Data.SqlClient.SqlException

Message: The instance of the SQL Server Database Engine cannot obtain a LOCK resource at this time. Rerun your statement when there are fewer active users. Ask the database administrator to check the lock and memory configuration for this instance, or to check for long-running transactions.

It turns out I was trying to delete so much data that the utility used up all the available locks for SQL Server.

The Solution

I figured that I needed some way to remove the unused blobs in smaller batches so that we could acquire the locks and then release them as data is deleted.  I contacted Sitecore Support to come up with a way to do just that.  With their insight into what was happening behind the scenes, we came up with a script that can be run manually to clean up the blobs table.

DECLARE @UsableBlobs table(
    ID uniqueidentifier
    );

INSERT INTO 
    @UsableBlobs    
select convert(uniqueidentifier,[Value]) as EmpID from [Fields]
where [Value] != '' 
and (FieldId='{40E50ED9-BA07-4702-992E-A912738D32DC}' or FieldId='{DBBE7D99-1388-4357-BB34-AD71EDF18ED3}') 
delete top (XXXXX) from [Blobs] 
where [BlobId] not in (select * from @UsableBlobs)

Using a temp table, the script looks for all valid blobs and stores them.  It then finds all the blobs not in the temp table and deletes them.  Simply replace the "XXXXX" in order to control how many records are deleted at once.  I started with one record to prove the concept and then went to 1000 and eventually was deleting 200k records at once with no issues.

I was able to clean up the databases manually and recover the space for the database servers.  We modified our scheduling of the agent to run less frequently and additionally created a 'clean-up' agent that ensures that we don't run into this issue again.

It should be noted that this script shouldn't replace the "Clean Up Databases" utility, but can be used in cases where things have already gotten out of hand.  When possible, use the built-in Sitecore utilities to manage the databases.

Also note: Please make backups of your data before running any scripts you find on the Internet.

Additional Reading

My Stack Overflow question regarding this issue: http://bit.ly/1dp3109
Dan Solovay's Stack Overflow answer about the "Clean Up Databases" Utility: http://bit.ly/1fMv2mF